


Results 1 to 15 of 55
 LinkBack URL
 About LinkBacks
-
03-21-2007 08:25 PM #1
 CHR Member

- Join Date
- May 2004
- Location
- Tsawwassen
- Car Year, Make, Model: 32 Roadster, 33,3 Wd Coupe
- Posts
- 17
32 Ford Roadster Windshield Finger Pulls
I want to instal finger pulls on my new roadster windshield. Can anyone give me the correct dimensions where these should be located along the bottom of the windshield frame.
Thanks
HemiDeuce
-
Advertising

- Google Adsense
- REGISTERED USERS DO NOT SEE THIS AD
-
03-22-2007 05:32 AM #2
CHR Member
- Join Date
- Dec 2004
- Location
- N/W Arizona
- Car Year, Make, Model: Deuce Highboy roadster
- Posts
- 1,174
Doesn't your windshield frame already have the holes drilled?
And maybe you're just double checking?
Generally speaking, the pull is right in front of each occupant.
Here's a pic to give you a general idea and if need be I can measure mine for you.C9
-
03-22-2007 06:25 AM #3
CHR Member
- Join Date
- Jan 2005
- Location
- Pawling
- Car Year, Make, Model: Anything with a Big Block
- Posts
- 16
The finger pull location is exactly 10" in from each end on a stock windshield. Theyre Countersunk on the outside only.
-
03-22-2007 01:12 PM #4
CHR Member
- Join Date
- May 2004
- Location
- Tsawwassen
- Car Year, Make, Model: 32 Roadster, 33,3 Wd Coupe
- Posts
- 17
Windshield Finger Pulls
My new repoduction windshield did not come drilled for the finger pulls or the rear view mirror bracket.
Would that 10" dimension be from the outer edge of the windshield, or the inside corner of the frame?
Thank you both for your replies.
HemiDeuce.
-
03-22-2007 03:20 PM #5
CHR Member
- Join Date
- Dec 2004
- Location
- N/W Arizona
- Car Year, Make, Model: Deuce Highboy roadster
- Posts
- 1,174
I measured mine this afternoon . . . 10" from the vertical outside of the windshield frame. Originally Posted by HemiDeuce
Strikes me that an inch or so either way won't make a difference.
However, if your windshield has glass installed, you may hit it when drilling.
More than likely you'll only hit the edge of the glass.
When I enlarged the window pull hole on the drivers side of my 32 the 3/8" drill cut into the glass about a third of the drill diameter - which is to say the notch in the glass was about 1/8" deep.
I used a new, sharp 5% Cobalt drill for the drilling, went slow and the glass cut just fine without shattering.
Goes without saying you need to do this in a drill press.
I used a piece of 3/4" plywood on the drill press table, under the windshield frame and used another piece of 3/4" plywood for clamping.
No cutting oil was used due to I didn't want oil rotting the glass tape or creating other problems.
If the frame is chrome plated or polished stainless I recommend you put a piece of masking tape on the windshield frame for marking and to help the drill start in the right location.
Using a center punch on a frame w/glass can damage the glass sometimes.
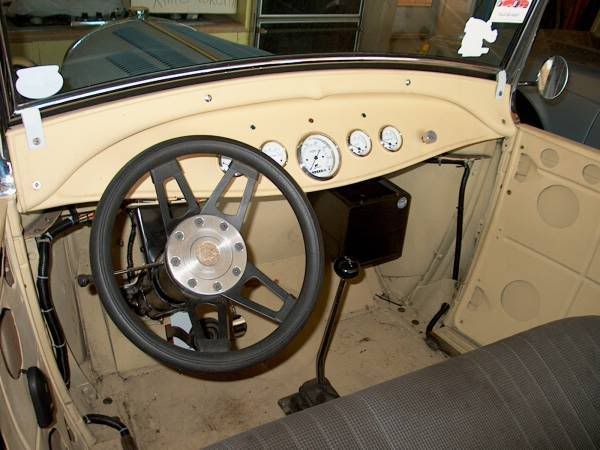
The pic shows the Windshield Wiper motor installed in the 3/8" hole.
The WW motor was put on the bottom of the windshield frame because it impinged with the drivers view when it was on the top of the frame in the already drilled WW motor hole.Last edited by C9x; 03-22-2007 at 03:25 PM.
C9
-
03-22-2007 04:03 PM #6
CHR Member
- Join Date
- May 2004
- Location
- Tsawwassen
- Car Year, Make, Model: 32 Roadster, 33,3 Wd Coupe
- Posts
- 17
C9 thank you for your reply. I guess I'm being a bit of a coneheadder about being so precise, but I'm really a Hot Rodder. I am building a real 32 that has taken a huge amount of work to bring back from the dead, so to speak. It was an old early 60's hot rod that was channelled, had 34 windshield posts welded to the cowl, Cougar sequential tail lights inset into the rear pan below the trunk, scoop over the inset licence plate in the trunk, rear fenders welded to to body, etc. The favorite tool of the day apeared to be the Hot Wrench and Brass rod. I've righted all the sins of the past and am at the fun stage now, finished the frame and running gear and assembling all the small goodies on the body and about to spray Lizzard Skin on the floor pan and boards, then mount the body for the final time. I'll try my hand at picture posting in another post.
Thanks for all your help.
HemiDeuce.
-
10-13-2007 09:36 AM #7
CHR Member
- Join Date
- May 2004
- Location
- Ashland
- Car Year, Make, Model: 29 fendered roadster
- Posts
- 2,160
C9x, This is an old thread, but I am having trouble with my 2" chopped windshield for my '29. You are really a careful worker and I appreciate your comments about drilling though the glass for the finger pulls. I am wasting a weekend waiting to contact the guy at Brookville who installs their windshields. I bought a Brookville 2" chopped chrome frame along with their top irons. A local glass shop "installed" the glass but the side holes are 1/3 covered because the top piece will not go down far enough to line up the threaded holes with the holes in the side frame. I took it back to the glass shop thinking I could get 1/8" trimmed off the top but the guy showed me that even removing the rubber strip across the top the top bar will not go down any further because the top bar hits the side bar. If the frame was stainless I would just trim it with a Dremel bit but with a chromed frame that will probably just chip off the chrome plating. Another idea is to slightly wedge the side frame apart but how to do that without buckling the welds at the bottom of the frame. I do not know if I am the victum of creeping tolerances in manufacture of the frame or whether it is supposed to be a compression fit of some sort. Basically the top part of the frame needs to go down about 1/8 inch further into the side of the frame for the holes to line up. For those folks who criticize some of us for just buying parts, this is just a reminder that many, many parts do not fit as one might expect and one of my most used tools is a rat tail file! Is this a mis-manufactured set up or just the usual cut and fit situation? The only thing I can think of over the weekend is to put the windshiled in position and IF (?) the holes line up with the stanchion holes I can oval out the holes in the side frame with a dremel tool, but I don't want to do that because if I "raise" the holes then the bottom of the frame will not fit above the cowl lip!
Don Shillady
Retired Scientist/teen rodderLast edited by Don Shillady; 10-13-2007 at 04:40 PM.
-
10-13-2007 01:12 PM #8
CHR Member
- Join Date
- Apr 2001
- Location
- Salado
- Car Year, Make, Model: 32, 40 Fords,
- Posts
- 10,887
I'm not sure I follow your description but if I do the question I'd ask is if the frame pieces fit together before the glass was installed? If so, I would think that's your answer.Your Uncle Bob, Senior Geezer Curmudgeon
It's much easier to promise someone a "free" ride on the wagon than to urge them to pull it.
Luck occurs when preparation and opportunity converge.
-
10-13-2007 03:07 PM #9
CHR Member
- Join Date
- May 2004
- Location
- Tsawwassen
- Car Year, Make, Model: 32 Roadster, 33,3 Wd Coupe
- Posts
- 17
I sounds to me that your glass is cut a little too large for the windshield frame. I had mine cut a little smaller and shimmed to the proper size on the top and sides with windshield shimming tape.
-
10-13-2007 04:25 PM #10
CHR Member
- Join Date
- May 2004
- Location
- Ashland
- Car Year, Make, Model: 29 fendered roadster
- Posts
- 2,160
Thanks for the comments. I got frustrated mainly because I needed a second person to hold the other side of the windshield and finally my son visited and I decided to oval out the holes with my Dremel rotary file (sort of like a dental drill only a little larger). With a second person to help and a little grinding we got it together. I was afraid it would not clear at the bottom but in fact the rubber barely covers the gap. I shouldn't be here because this is a '29 A roadster not a Deuce but I always try to absorb whatever C9x says and Bob has plenty of good suggestions from experience. For some reason my picture is pretty dark but you can see it is on there now. I still need to add some washers between the stanchion and the butterfly and trim some of the extra rubber around the top but thanks to my trusty rat tail file I got the stanchion screws to line up with the holes I tapped. As far as I know the original holes just do not fully line up but with a little grinding it is on there now. Now two new questions arise. What is supposed to keep the windshield from coming further in????? So far all that keeps it where it is, is the vertical hang and the friction at the butterflies. Second, there are grooves on the inside of the stanchions so I suppose some rubber is supposed to go there? If not, there is one heck of a large gap between the stanchion and the windshield frame! Should there be some sort of stop to keep the windshield from swinging in too far? Thanks for your patience, this is the first actual progress I have made on the car in over a year due to another committment and it is exciting to see that shiny frame even if it is a little dark in the picture. HemiDeuce, you echoed my thoughts but it is metal on metal at the top corners so either I would have to spring the sides out or oval the holes on the side, fortunately the Dremel worked.
Don Shillady
Retired Scientist/teen rodderLast edited by Don Shillady; 10-13-2007 at 04:36 PM.
-
10-14-2007 10:11 AM #11
CHR Member
- Join Date
- Dec 2004
- Location
- N/W Arizona
- Car Year, Make, Model: Deuce Highboy roadster
- Posts
- 1,174
Looks ok so far Don.
Did you have the glass cut to a pattern?
On my 32 I had the glass guy do the complete install.
One thing you do want to do is make sure you can remove the locking screws up top so the glass guy can get em un-screwed ok.
Glass workers seem to have a delicate touch and I have yet to get back anything they've torn up.
Still though, I've got more than a few things back from "pro mechanic's" - and I use the term loosely - that were torn up all to heck and gone.
With the implication that it was my fault cuz the bolt or whatever was hard to get out.
You'll probably need something to keep your 29's windshield from coming back.
Not a problem on the 32's, the cowl 'eyebrow' as it's called along wth the bottom weatherstrip keeps the windshield in the proper place.
My pal's 29 windshield came back due to wind pressure.
I was gonna knock out a subtle little piece for him, but he opted for a 1/8" x 1" short strip of bent aluminum"
He's a production oriented 'get-er-done' kind of guy . . . what can I say?
Got pics if you like.C9
-
10-14-2007 12:04 PM #12
CHR Member
- Join Date
- Apr 2001
- Location
- Salado
- Car Year, Make, Model: 32, 40 Fords,
- Posts
- 10,887
A little lighter for you Don;Your Uncle Bob, Senior Geezer Curmudgeon
It's much easier to promise someone a "free" ride on the wagon than to urge them to pull it.
Luck occurs when preparation and opportunity converge.
-
10-14-2007 02:48 PM #13
CHR Member
- Join Date
- May 2004
- Location
- Ashland
- Car Year, Make, Model: 29 fendered roadster
- Posts
- 2,160
Thanks Bob for lightening the photo, Denny did it too but I don't know how you guys did it? Today I found the "T" cross section rubber in the Bratton original parts catalog for the side coverage. C9X that is the sort of detail I appreciate. Who needs pulls when the wind will blow the glass back anyway. Now I know I need to ponder over some sort of "stop". I wonder how a wall mount bottle opener would look, hah? Probably that is too wide but an interesting idea. I wonder what held the stock windshield? There is an original roadster near me, maybe I can take a look at that. If push comes to shove I prefer angle iron over aluminum for paintability but I will look around for some aluminum angle too. There was no pattern and I left it to the glass guy to cut the piece but when I took it back he stalled as to trimming 1/8" off the top. I may look around for another glass shop to cut the windwings, I will have patterns for them. I don't know whether to buy the stock tall windwings and have 2" trimmed off the bottom or try to get the whole angled shape cut; certainly I don't have much confidence in this glass shop. Overall, looking at what is there now the 1/8" lowering due to the oval hole helps the coverage of the rubber flap a bit. C9X thanks for the realistic comments out of your experience, I am afraid I am a "git-er'done" guy also but your comments are valuable! If you have a picture of you friend's "stop" I would like to see that.
Don Shillady
Retired Scientist/teen rodderLast edited by Don Shillady; 10-14-2007 at 02:51 PM.
-
10-14-2007 03:14 PM #14
CHR Member
- Join Date
- May 2004
- Location
- Ashland
- Car Year, Make, Model: 29 fendered roadster
- Posts
- 2,160
Bob, can you send that picture to me by e-mail to quantummechanicsllc@msn.com ? I used thecamera on "auto" but the metallic maroon just soaks up the light.
Don Shillady
Retired Scientist/teen rodder
-
10-14-2007 04:54 PM #15
CHR Member
- Join Date
- Dec 2004
- Location
- N/W Arizona
- Car Year, Make, Model: Deuce Highboy roadster
- Posts
- 1,174
Originally Posted by Don Shillady
Most photo programs will lighten up stuff.
Works especially well as you can see in the two pics of me and granddaughters.
The family room is almost black in the original, but the digital info is there.
Once lightened, the kitchen area, the girls and I are overexposed, but the family room lights up nicely.
Someone more skilled than I could set things up so both area's are properly exposed.


Here's the windshiled gizmo.
Incidentally the finger pull is needed to pull the windshield back into place.
If'n I was doing a windshield stop - and I'm probably going to have to - an aluminum block machined to nicely rounded flowing shape with some hidden hold down bolts coming in from underneath and having a crank on it that looks like it could be for getting the windshield in and out, but does have an actual function (hood latch?) would do the trick.
Think I've mentioned it before, but I don't care for fake stuff nor things that cover up good honest hot rod parts.
Aluminum paints well if the proper primer is used.
I've had good luck with rattle can zinc chromate primer and an epoxy.
Aluminum also powder coats quite well and is easy.
Bring some of those faded green things in your wallet and grease the powder guy's palm and all will be well....
C9
 Reply With Quote

Posting Permissions
- You may not post new threads
- You may not post replies
- You may not post attachments
- You may not edit your posts

You're welcome Mike, glad it worked out for you. Roger, it's taken a few years but my inventory of excess parts has shrunk a fair bit from 1 1/2 garage stalls to about an eight by eight space. ...
1968 Plymouth Valiant 1st Gen HEMI