-
05-19-2013 08:34 PM #16
-
Advertising

- Google Adsense
- REGISTERED USERS DO NOT SEE THIS AD
-
05-20-2013 05:48 AM #17
I made a drawing of how I made the top pin pivot. Will get photos of it when I get in the garage and take it out of the deck lid next time. Used 1" x 1/8" steel plate to mount unit to deck lid. welded two 5/16" nuts vertical to this for the axle to swing in. the axle is a metric 8M nut with 5/16" round stock welded to each side to form the axle. Top pin screws into this metric nut and swivels perfectly for trunk to close and latch.


-
05-20-2013 06:25 AM #18
Slick! Innovative idea, and it maintains full adjustability.Roger
Enjoy the little things in life, and you may look back one day and realize that they were really the BIG things.
-
05-20-2013 04:51 PM #19
finished up some things on the pinched front end today. moved the rear mounting holes in the chassis up 2" on the back of the hairpins since I changed the original 4" drop to a 6" drop axle. had to shorten the brake line running behind the front crossmember since I took over 4 inches out of the crossmember to give the frame a full pinch but all other brake lines N&N had on chassis worked fine as is. swapped out lower shock mounts on the axle from left to right and that took care of moving the shocks more inboard to match the narrower frame. have to weld back on the upper shock mounts yet and also the panhard bar mount has to be rewelded on in proper position for the new pinch.

-
05-21-2013 03:52 PM #20
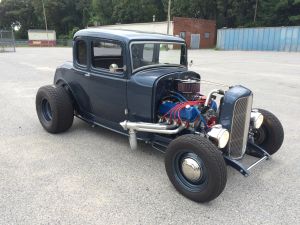
Lowered the front end with the 6" drop axle plus will take one or two leaves out of front spring too to get front end lower yet so needed to get the back end down a couple inches too. Cut out trunk floor today to get more travel room between center of rear end and trunk floor. Will fiberglass the hole back in with a 2 inch rise in that area. With gas tank in trunk and more space lost with the riser, we won't be carrying much luggage. Wife has been busy this week getting templates made for door panels, kick panels, etc so she can start doing her upholstery work. let her pick out fabric and colors and design the interior. photo is her mockup for the center console which will house the floor shifter, air conditioning controls and radio. We will just fiberglass right over this mockup to make the console since this is just a one off piece and won't make a mold. Also set it on its front wheels first time today since taking it apart to pinch the nose of the frame.


-
05-21-2013 05:08 PM #21
Thinking about this swivel mount, the only issue I see is my wife deciding to close the trunk, knowing that any portal closed is meant to be "slammed". Seems that a sharp downward motion might result in the pin swinging too far and missing the latch assembly. Maybe it can't swing that far?Roger
Enjoy the little things in life, and you may look back one day and realize that they were really the BIG things.
-
05-21-2013 06:03 PM #22
the system by design has a built in stop since the metric nut is a half inch in diameter and only 1/8" off the metal plate, it can only swing so far. you can easily build more of a stop into it by tack welding more metal onto the nut to lessen the 1/8" gap so it is infinitely adjustable to make it so it can only swing so far. I am also going to improve the system by adding a spring onto the swivel so the pin has some tension against the stop and is always against the stop when trunk is open and always points straight down onto the center of the receiver when the trunk is closing to further make a better latch system out of it. So no matter how fast or hard you slam the trunk, everything has to fall into place perfectly. Without this spring being added, as it is now, you are relying on gravity to have the pin rotate downward and align itself with the receiver. With the spring you are mechanically forcing the pin to align perfectly every time.
look at the photo I have of the pin. it is at full stop and will swivel no further when trunk is half open with gravity pulling pin down. so you can see that it can't swing so far toward the front of the trunk to miss the receiver. I haven't measured the travel but it can't be any more than 1/2" full travel and again, that can be lessened by welding some material to the metric nut.Last edited by daytonagary; 05-21-2013 at 06:36 PM.
-
05-25-2013 12:11 PM #23
dropped an engine and trans in today to check clearance on everything after I pinched the frame and all is perfect. Now I can get measurements for building driveshaft and steering shaft. also cut 2" off panhard bar and rewelded its mount to chassis this morning. Have to relieve bottom of frame above the front leaf spring to allow for spring travel because of the pinch job, weld back on the front shock mounts, and finish off the very rear of frame where I cut off rear frame horns and frame will be ready for paint.

-
05-25-2013 10:43 PM #24
Wow, nice looking build Gary. I will be watching to pick up some pointers. The body looks nice and it's nice to see your wife is helping with the interior. That's what it's all about. I love stories like this.
New Age Motorsports 32 5/W 521/C6

-
05-26-2013 05:11 AM #25
Gary,
Looks like you've got he trunk pin figured out. My concern was that from full open a sharp downward snap will tend to throw the pin away from the hinge point, flipping it toward the rear of the car against gravity. Your explanation that a strategic weld "stop" can limit travel makes perfect sense. Thanks for the idea.Roger
Enjoy the little things in life, and you may look back one day and realize that they were really the BIG things.
-
06-09-2013 06:39 AM #26
Lots of work done on the 32 the last 2 weeks. Photo is how I built the lower steering column mount into the firewall. Was using some lengths of pvc pipe to help figure out where and how to cut the hole in the firewall when I came upon this piece that is just over 2" inside diameter and my column is 2" so I got the idea to use it here. I can never get the hole in the firewall in perfect place and shape the first try so this solved all my problems. After I cut the hole and had to move it and elongate it a little to get the steering column to miss the engine I was able to close the hole up perfectly by fiberglassing this piece of pvc to the firewall. Makes a beautiful fit and finish outside the firewall and since this car will have no hood sides it will be easily seen. I just cut some relief slots in the top of the pvc where I can wrap a hose clamp around to hold the steering column tight. After upholstery none of the pvc will be seen on the inside. Wouldn't work easily in a steel car but for fiberglass it is perfect. Now i have to find a way to finish the hole in the firewall for the brake pedal to pass through and look just as clean from the outside as column does. I have risers welded to bottom of seats and drilled the holes in floor to bolt the seats down. Put in the steering column drop, steering column and cut the steering shaft to fit and added the joints so car steers now. Welded up brackets inside trunk to mount gas tank and it is now bolted in. Also welded brackets under dashboard and mounted the air conditioner unit from Vintage Air. Cut holes in dash for gauges and air conditioning outlets as well as led lights for turn and bright light indicators. Welded bracket under dash to mount my fuse panel onto also. Shifter is mounted to floor of car and hole cut in floor for bracket to go down to transmission. Wife has been finishing her floor console and starting on door panels and kick panels now that the arm rests have arrived. I will be installing the third member in rear end today so I can get measurement for driveshaft length. Also hope to get fuel sending unit in gas tank and running plumbing from tank inside trunk to under car in preparation for installing the electric fuel pump and regulator today. I didn't get photos when I had all these items installed in car but next time I get them all in place for final mock up before tear apart for paint I will get plenty. Attached are photos of the lower steering column mount.


-
06-09-2013 09:06 AM #27
I'm just curious how much clearance you have between your oil pan and the ground.Jack
Gone to Texas
-
06-09-2013 11:12 AM #28
4 1/2 inches right now but going to lower front another inch so will be less than 4 inches when I get done. I like them in the weeds. There is room between the transmission and transmission tunnel to raise the engine an inch if I want to get the chassis lowered even more.
-
06-09-2013 02:50 PM #29
I like them low down in the weeds too and the only time I have to really think about clearance is judder bars / speed humps, and the odd driveway where the camber of the road and the foot path are too sharp. If I wanted to drive a 4 wheel drive 4 storey high vehicle I would own one like that but Hot Rods should be low but driveable within reason.I maybe a little crazy but it stops me going insane.
Isaiah 48: 17,18.
Mark.
-
06-09-2013 03:11 PM #30
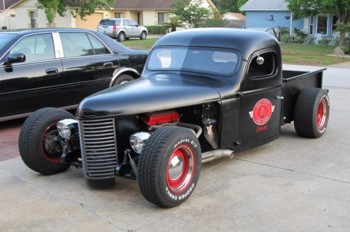
I run with the nose of my front grille of my 48 International Street Rod truck only 2" off the ground and the oil pan isn't up much higher. 12,000 miles and no problems. just have to be careful. photo attached

Welcome to Club Hot Rod! The premier site for
everything to do with Hot Rod, Customs, Low Riders, Rat Rods, and more.
- » Members from all over the US and the world!
- » Help from all over the world for your questions
- » Build logs for you and all members
- » Blogs
- » Image Gallery
- » Many thousands of members and hundreds of thousands of posts!
YES! I want to register an account for free right now! p.s.: For registered members this ad will NOT show


 28Likes

 LinkBack URL
 About LinkBacks
 Reply With Quote

You're welcome Mike, glad it worked out for you. Roger, it's taken a few years but my inventory of excess parts has shrunk a fair bit from 1 1/2 garage stalls to about an eight by eight space. ...
1968 Plymouth Valiant 1st Gen HEMI