


 28Likes

Results 31 to 45 of 102
 LinkBack URL
 About LinkBacks
-
06-09-2013 05:19 PM #31
 CHR Member

- Join Date
- Apr 2004
- Location
- Little Elm
- Car Year, Make, Model: 34 Ford Low Boy w/ZZ430 Clone
- Posts
- 3,890
I had mine in the weeds, but I couldn't get it in or out of my driveway or my garage. I was also worried about the thickness of the paint stripes on the highway.
Jack
Gone to Texas
-
Advertising

- Google Adsense
- REGISTERED USERS DO NOT SEE THIS AD
-
06-09-2013 05:53 PM #32
CHR Member
- Join Date
- Sep 2007
- Location
- New Bedford
- Car Year, Make, Model: 34 Ford 3W Coupe Replica
- Posts
- 14,743
Like Jack, I had mine as low as 3.5" at the lowest point but, I've been raising it so I can clear my driveway and manholes give a new meaning to pucker factor! 8-)
-
06-09-2013 07:47 PM #33
CHR Member
- Join Date
- Oct 2011
- Location
- Glen Burnie
- Car Year, Make, Model: 1932 5W Coupe
- Posts
- 138
Looking good Gary; thanks for the pictures!New Age Motorsports 32 5/W 521/C6
-
06-12-2013 04:49 PM #34
CHR Member
- Join Date
- Dec 2008
- Location
- Port Orange
- Car Year, Make, Model: 32 Ford 3 Window Coupe from N&N Fibergla
- Posts
- 126
Today I did the finish work on the fiberglass console my wife built for the car. I am going to put a gelcoat finish on this one and make a mold from it before I cut holes for air controls, radio and shifter so I can reproduce these in fiberglass for the next 32 we build much quicker than starting from cardboard mockup as we did this one. The rear gear came in so my wife pulled the axles and we set the 3rd member in place and she got it all back together so we can keep dirt out of it now. I installed the inside door opening mechanism in the doors and also installed the window switches which go in the doors and let you use a regular door handle for the control and looks like they are old fashioned wind up windows that way. Both door opening system and window switches came from Carolina Customs. Put the fuel gauge sending unit in the gas tank and made a list of what I need to get in the morning to finish plumbing the fuel tank gas out, return gas line and vent line to under car from inside trunk area. Wife is working on all her templates for the remaining upholstery panels needed for trunk and interior next.

-
06-13-2013 02:37 PM #35
CHR Member
- Join Date
- Dec 2008
- Location
- Port Orange
- Car Year, Make, Model: 32 Ford 3 Window Coupe from N&N Fibergla
- Posts
- 126
photo of wife busy at work on her interior panels. Have gas tank mostly plumbed to electric fuel pump. have to finish running the return line to regulator and mount the 1/4" vent line as it goes down through floor. this universal tank didn't have a place for return line so I had to drill hole in block off plate they use if you wanted to put the fill in the side of the tank. Welded a fuel line into that plate and bolted it to side of tank today. the fill tube with screw on top came 3" up and was going to be hard to put gas in car with it under trunk lid area so I cut it at an angle and it faces forward just right now.


-
06-13-2013 03:29 PM #36
CHR Member/Contributor
- Join Date
- Sep 2007
- Location
- Gardner, KS
- Car Year, Make, Model: '33 HiBoy Coupe, '32 HiBoy Roadster
- Posts
- 11,210
Gary, Originally Posted by daytonagary

Not being critical at all, but on the console did you consider dropping that rear most curved panel down with more of a rearward slant as opposed to ninety degrees to the top? Seems to me it might look a little better either a true vertical, or maybe even kicked back a couple of inches at the bottom so that it slants up to the flat top. Just lookin' and wonderin'?
Also, just curious how you attached your fuel tank to the car body? I have the same tank, and the first time I set it in place I put the tank fill on the driver's side, which put my supply & return on the passenger side. That meant I had to cross over up front, but I think I did it that way because of the brake & clutch master cylinders blocking access down the drivers frame rail. Sounds good today, anyway....Last edited by rspears; 06-13-2013 at 03:41 PM.
Roger
Enjoy the little things in life, and you may look back one day and realize that they were really the BIG things.
-
06-13-2013 05:01 PM #37
CHR Member
- Join Date
- Dec 2008
- Location
- Port Orange
- Car Year, Make, Model: 32 Ford 3 Window Coupe from N&N Fibergla
- Posts
- 126
i agree with you on the console idea, it would look better with your suggestions but the wife has real short legs and seat has to move all the way forward for her to reach the pedals which puts the seat right against the console as it is built now. and wanted the shifter as far back as possible so with the seat all the way back I can reach it without having to lean forward so couldn't shorten the console to get the rear curved down like I also would have preferred. Another deciding factor was my wife has recently retired and is home helping me build these rods everyday now and wanted to give her some sense of accomplishment here and I just told her the shifter, air controls and radio have to go in there so go design it. This is what she came up with. I did tell her she had the option of slanting the top of the console down more parallel with the transmission hump instead of parallel with the floor but she made the decision on floor and is happy with it so that is what we have. I would have slanted it down more and also incorporated your rear feature ideas.
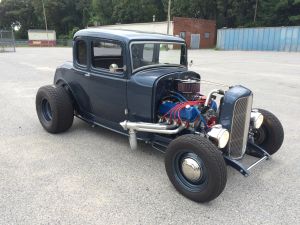
On the gas tank I used the holes in the bottom and front edge of the tank that are built into the tank to bolt it in. Had to weld a couple tabs to the square metal cage that separates the trunk from the drivers compartment to bolt it at top and also use some 2" wide steel welded to the bottom part of that cage extending to the rear which is what the tank is sitting on and is bolted to at bottom. I will get some photos with the tank out of the car soon. Didn't like to have to cross the fuel lines over to the passenger side for my small block chevy with 3 deuces but that is the only drawback to what I have. The tank mounted easily and can easily be removed for service with just 4 bolts holding it and the electric fuel pump and fuel regulator sits just below and about a foot in front of the tank under the car so that plumbs rather easily. Just have to get the line up to the engine now. Will have battery under car to mount yet with it going right below driver seat with an Optima battery laying on its side and the transmission cooler is going under passenger seat. Will engineer and build those mounts tomorrow. This is my favorite part of the build, designing and engineering everything to work together, fit properly and built to be serviced as needed in future. Once it is all bolted together and ready to be blown apart for paint it becomes more work than fun for me. below is photo of my last build when it was basically ready to drive except for wiring but I had to blow it apart and spend several months doing body and paint work. With all the rust repair it needed plus the chopping the top, channeling, etc, etc. it was hundreds of hours of body and paint work massaging those areas for a good straight finish. Was a 5 month job getting it back together to where you see it in this photo except fully painted. Getting too old for all that now so will enjoy what little body work will be needed to paint this 32. Don't expect to spend much more than a week on this 32 from blowing it apart to having it all back together painted.
-
09-20-2013 02:00 AM #38
CHR Member
- Join Date
- Dec 2008
- Location
- Port Orange
- Car Year, Make, Model: 32 Ford 3 Window Coupe from N&N Fibergla
- Posts
- 126
Have the complete car taken apart now after doing all the fabrication. Welded a battery tray onto frame which sits under passenger seat between frame rail and drive shaft and also welded tabs to mount transmission cooler which sits in front of battery. Tried a new method of removing body and it worked great. As i get older I have to find easier ways of doing things. :-) I cut two six foot 2 x 6's lumber and slid one between body and frame just behind firewall and slid the second one between body and frame where above rear axle. Was able to do this by myself using floor jack to raise body off of frame a few inches and slide the lumber in. I had removed the rear tires and lowered rear of frame down onto the ground first so while lifting body we didn't have to lift it to any big height. My wife and I and another couple, each grabbed onto the ends of the 2 x 6's and in seconds and with no one having to stretch or have a hard time holding on to the body, we had the body off and slid straight back onto the roller I built to sit the body on while painting it. I always build these roller from 4 castors, two 2 x 12's lumber and a piece of 3/4" plywood. see photos. I position the 2 x 12's onto the plywood so the holes in the floor pan that bolts the body to frame can be used to bolt down the body to my roller with lag bolts. I will use the same method of lifting body back onto frame with little chance of scratching the new paint job it will have. photos show the body bolted to roller and the chassis all wire wheeled by my wife ready for paint. Also going to use a new method of painting frame. wanting gloss black on my frames I usually just buy some Acrylic Enamel and paint it after priming. To get a better gloss on the finish and make it easier my paint shop had some black self etching primer that does not have to be sanded before top coating so I am just going to prime the frame in this black primer then shoot clear urethane enamel on top of that to get the gloss. will be much more glossy, durable and less likely to chip than the acrylic enamel I usually use. will have black primer on frame, rear axle and all suspension components today which has to set 24 hours, the clear on tomorrow and fully assembled back to a rolling chassis on Sunday. love it when a plan comes together. I have all the body work and fitting of doors etc. done so I will be able to block out the surface of the body and paint it shortly.


-
09-24-2013 03:42 AM #39
CHR Member
- Join Date
- Dec 2008
- Location
- Port Orange
- Car Year, Make, Model: 32 Ford 3 Window Coupe from N&N Fibergla
- Posts
- 126
chassis painted
photos of chassis up on legs I used to get it up so I could paint bottom and top at same time and then photo of finish painting with rear suspension installed.framepainted.jpg
framejig.jpg
-
10-17-2013 03:41 PM #40
CHR Member
- Join Date
- Dec 2008
- Location
- Port Orange
- Car Year, Make, Model: 32 Ford 3 Window Coupe from N&N Fibergla
- Posts
- 126
Got the engine and transmission in Monday and been buttoning everything else up on chassis since then. Will start finish painting the body when we get back from the Goodguys car show in Charlotte in a couple weeks.


Last edited by daytonagary; 10-17-2013 at 03:45 PM.
-
10-18-2013 11:25 PM #41
CHR Member
- Join Date
- Apr 2011
- Location
- Prairie City
- Car Year, Make, Model: 40 Ford Deluxe, 68 Corvette, 72&76 K30
- Posts
- 7,298
- Blog Entries
- 1
Very nice work! It looks really nice!Ryan
1940 Ford Deluxe Tudor 354 Hemi 46RH Electric Blue w/multi-color flames, Ford 9" Residing in multiple pieces
1968 Corvette Coupe 5.9 Cummins Drag Car 11.43@130mph No stall leaving the line with 1250 rpm's and poor 2.2 60'
1972 Chevy K30 Longhorn P-pumped 24v Compound Turbos 47RH Just another money pit
1971 Camaro RS 5.3 BTR Stage 3 cam, SuperT10
Tire Sizes
-
10-19-2013 05:51 AM #42
CHR Member/Contributor
- Join Date
- Sep 2007
- Location
- Gardner, KS
- Car Year, Make, Model: '33 HiBoy Coupe, '32 HiBoy Roadster
- Posts
- 11,210
Lookin' good, Gary. Is the body going to be black, too, to match the frame or are you going to contrast the body & frame with a different color body? I like the position for the battery. Will it drop out the bottom for replacement in the future, or are you doing an access panel beneath the seat?Roger
Enjoy the little things in life, and you may look back one day and realize that they were really the BIG things.
-
10-19-2013 06:56 AM #43
CHR Member
- Join Date
- Dec 2008
- Location
- Port Orange
- Car Year, Make, Model: 32 Ford 3 Window Coupe from N&N Fibergla
- Posts
- 126
body will be a rreal dark blue with a couple real small pin stripes then going around the body line and then clear coated. A Chevy color from early 2000's yukon. Battery will drop down. Two bolts remove the outer bar holding the battery up and it will drop right out. Have 17" smoothie wheels with beauty ring and baby moon caps with 30" tires going on rear to fill up wheel well of body. 15" wheels up front.
-
10-19-2013 08:04 AM #44
CHR Member
- Join Date
- Feb 2006
- Location
- Bartlett
- Posts
- 6,831
whats the specs on that driveshaft tube?
-
10-19-2013 09:09 AM #45
CHR Member
- Join Date
- Dec 2008
- Location
- Port Orange
- Car Year, Make, Model: 32 Ford 3 Window Coupe from N&N Fibergla
- Posts
- 126
The driveshaft is from Summit Racing and is 2 inches in diameter, balanced and comes with 1310 U joints for $149. available from 28.5 inches to 31" in 1/2 increments. DOM 1020 steel. lightweight and plenty strong. Used these in my modified race cars with lots of horsepower, lots of strain on them on bumpy dirt tracks and never had a problem with them so way more than needed for street but the price is right and don't have to hassle cutting a stock one down and running around getting it balanced. summitracing.com
 Reply With Quote

Posting Permissions
- You may not post new threads
- You may not post replies
- You may not post attachments
- You may not edit your posts

You're welcome Mike, glad it worked out for you. Roger, it's taken a few years but my inventory of excess parts has shrunk a fair bit from 1 1/2 garage stalls to about an eight by eight space. ...
1968 Plymouth Valiant 1st Gen HEMI