


 250Likes
Thread: Spitfire / Hemi build
Results 1 to 15 of 85
 LinkBack URL
 About LinkBacks
Threaded View
-
03-25-2019 03:39 AM #11
 CHR Member

- Join Date
- Mar 2003
- Location
- SW Arizona
- Car Year, Make, Model: 68 Ply Valiant, 83 El Camino
- Posts
- 3,864
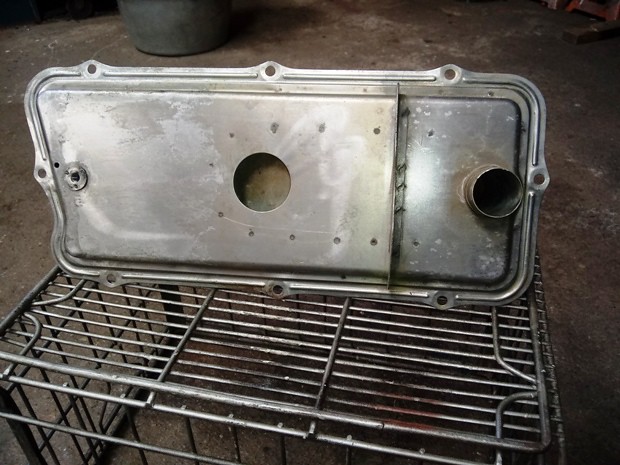
My wrist is getting a little better so I was able to get some light parts cleaning done. This weekend was spent getting the valley cover cleaned up.
The original valley covers have the oil fill tube and provisions for a PCV valve (the original location for the road draft tube). The cover is made in 2 pieces and also acts as the oil separator for the PCV system.
Most of the aftermarket valley covers I looked at have a flush mount oil fill which looks nice but can be a PIA to add a quart of oil to when you are on the road. They also have no provisions for a PCV valve. The common work around for the PCV is a bolt on breather kit for the valve covers. IMO they look OK on aftermarket valve covers but not so much on stock stamped ones like I'll be using let alone the Poly covers the engine will start out with.
With that in mind I decided to use the original valley cover rather than go the aftermarket market route.
 VP1 by M Patterson, on Flickr
The biggest problem with using the original cover is getting them clean......years of running non-detergent oil usually leaves a bunch of crud on the inside. It was not a problem years ago when most machine shops used a hot tank and they could be soaked to dissolve the stuff but the jet washes most shops use now don't do much good on the inside of them. The top and bottom of the cover are spot welded together and some guys split them for cleaning. I took an easier route and after I had it jet washed to get the outside crud off I soaked it in my 5 gallon bucket of carb cleaner for a couple of days. I managed to get a flashlight and dental mirror in to verify that it was completly clean and this is ready for a coat of paint.
 VP2 by M Patterson, on Flickr
OK saving almost $300 on aftermarket parts is also a big plus.
.Last edited by Mike P; 03-25-2019 at 03:46 AM.
I've NEVER seen a car come from the factory that couldn't be improved..... 

 Reply With Quote
Posting Permissions
- You may not post new threads
- You may not post replies
- You may not post attachments
- You may not edit your posts

A travel agent was sitting at his desk when he noticed an elderly couple standing outside, gazing longingly at the posters of dream vacations in the shop window. They looked sweet, and honestly, a...
the Official CHR joke page duel