-
04-14-2024 05:58 PM #46
I wish I had somebody to come help and hang out at my shop !
-
Advertising

- Google Adsense
- REGISTERED USERS DO NOT SEE THIS AD
-
04-14-2024 09:30 PM #47
I wish I'd had a grandpa like you.
You're a good man.johnboy
Mountain man. (Retired.)
Some mistakes are too much fun to be made only once.
I don't know everything about anything, and I don't know anything about lots of things.
'47 Ford sedan. 350 -- 350, Jaguar irs + ifs.
'49 Morris Minor. Datsun 1500cc, 5sp manual, Marina front axle, Nissan rear axle.
'51 Ford school bus. Chev 400 ci Vortec 5 sp manual + Gearvendors 2sp, 2000 Chev lwb dually chassis and axles.
'64 A.C. Cobra replica. Ford 429, C6 auto, Torana ifs, Jaguar irs.
-
04-15-2024 05:34 AM #48
You're settin' the Grandpa bar awful high, Mike!! I envy your relationship with the grandson's. None of mine have ever had any interest hanging out around the shop, which is probably more a reflection on me than them....Roger
Enjoy the little things in life, and you may look back one day and realize that they were really the BIG things.
-
04-23-2024 09:18 AM #49
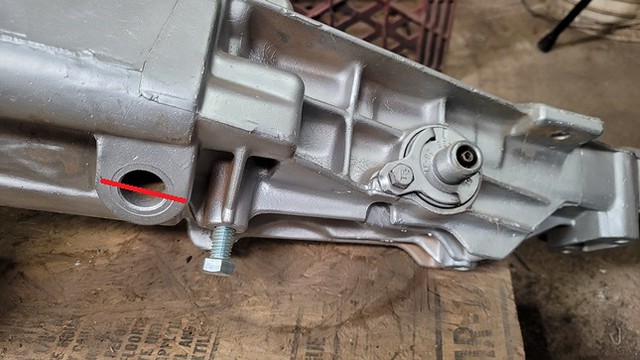
Cade and I kept plugging away at getting the engine and trans mock-up done on Sunday. It looks like we have just one more hurtle to clear. We ran into an interference issue with a boss on the OD unit and the trans crossmember. On the transmission thatís going into the car the hole is plugged so trimming the part of the boss off will not be a problem. On the mock-up case itís threaded (Iím guessing for a plug). As the mock-up case is borrowed, I want to talk to the guy I borrowed it from to see if he will let me trim that area or has a junk housing I can cut. If not Iíll trim the OD housing on the complete transmission I have thatís going in the car then pull the mock-up engine and trans out of the car and mount the rebuilt transmission to the mock-up engine. Either way I have to trim the boss where Iíve drawn the red line to get the engine/trans in straight before I built the motor mounts.
 z OD int 2 by M Patterson, on Flickr
For AC/heat Iíd been debating on whether to put the factory heater from the parts car in the green car and use an under dash AC unit or buy a combination heat/AC unit.
The heater had been pulled from the Green car when it was built and the firewall holes filled. I decided to go with a unit that I suspect is probably made by the same outfit as the heat/AC unit Seth is running in his 53 Dodge truck. I got the one with the 6 outlets that should tuck under the dash (yeah I know itís going to be a mess of hoses by the time I get through).
 z ac by M Patterson, on Flickr
Iím still looking for some vents to mount under the dash that I like but I think it should work out OK.
We pulled the factory heater out of the mock-up car Sunday, mostly to get the blower motor out of the way. And it looks like there should be enough room under the dash to get everything tucked up there. I may not be Cadesí favorite person when itís all doneÖ..but he fits under the dash so much better than me .
.
.I've NEVER seen a car come from the factory that couldn't be improved..... 
-
04-24-2024 04:32 AM #50
Just tell Cade it's yet another "right of passage". Who doesn't enjoy laying head down, peering into the dark, winding too large arms past razor sharp brackets trying to reach hidden fasteners?Your Uncle Bob, Senior Geezer Curmudgeon
It's much easier to promise someone a "free" ride on the wagon than to urge them to pull it.
Luck occurs when preparation and opportunity converge.
-
04-29-2024 04:39 PM #51
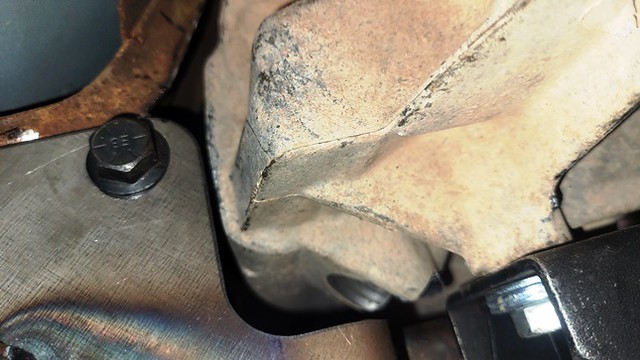
The beginning of last week talked to the friend Iíd borrowed the 46RH case Iíd borrowed from. He had a few spare OD housings so he didnít care if I cut this one for clearance. The trimming did the trick and we were finally able to get the transmission where it belonged.
 OD Trim by M Patterson, on Flickr
The transmission tunnel pretty much dictates how far forward the engine sits in the engine bay. The clearances are snug but it should work and Iíll still have room to get the cooler lines and components for the controller in. With bracket for the transmission mount and the mount installed there is not a lot of room between the bottom of the OD housing and the crossmember. Itís fine with a new mount in place but over time or god forbid if the trans mount gets oil soaked Iím afraid it might collapse enough to create a problem so Iíll probably swap out the rubber mount for a urethane one (this was an issue I had with the 57 Plymouth and the solution I came up with).
Next weekend weíll work on motor mounts (which means also figuring out what weíll have to do on exhaust). The fun never ends.
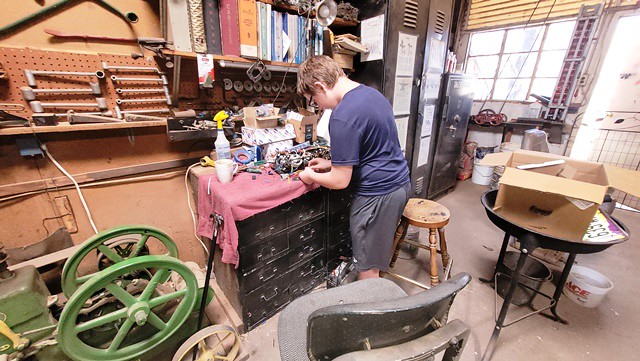
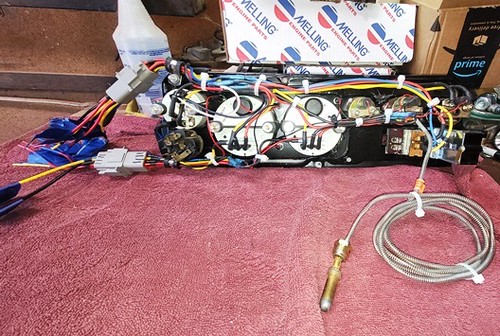
This afternoon I worked with Austin finishing up the gauge cluster. Time to turn the wiring diagram into a functional gauge cluster. It was a lot of repetitive work connecting the circuits but in the end we hooked a battery up and checked the function on everything we could. He was impressed when we hooked up the sending unit and the fuel gauge worked.
 z aust wiring by M Patterson, on Flickr
I know itís not as pretty as the work a lot of you guys do, but itís functional.
 z AW2 by M Patterson, on Flickr
At the end of the day I asked him if he knew that grandpa knew how to make magnetsÖ..he looked at me with that ďok whatís the jokeĒ look. I showed him the trick of wrapping a coil of wire around a screwdriver blade and touching it to a battery. I think he tried to pick up everything in the shop with that darn screwdriver. Anyway I told him an old mechanic had shown me that trick when I was about his age. He looked at me and grinned then said ďwell an OLD mechanic showed me that trick nowĒ (darn smart aleck LOL).
.I've NEVER seen a car come from the factory that couldn't be improved..... 
-
04-29-2024 06:58 PM #52
Good times! The wiring looks great.
-
05-06-2024 03:36 AM #53
Another Sunday come and gone. Cade and I tackled final engine placement and exhaust. The biggest issue with the exhaust was clearing the steering box.
I had 4 sets of exhaust to start with. A set of the shorty headers, a pair of the 4 bolt flange truck/Chrysler 300 manifolds and 2 pair of 55-56 Chrysler exhaust manifolds.
 exhaust by M Patterson, on Flickr
We tried the headers first no way/ no how (kind of figured that but had to try). Next up was the truck manifolds. These were the ones I really wanted to use. These have a 2 Ĺ” outlet and are supposed to be the best flowing factory manifolds for the early HEMIs. Unfortunately, because of the angle the manifolds dumped at they didn’t clear the steering box.
A pair of the 55-56 manifolds did fit. It’s tight around the steering box but I’ve built cars with less clearance. I’ll probably build a heat shield between the box and manifold but it’s a manual steering gear and should be fine.
The 55-56 manifolds only have a 2 inch outlet and are the option I least wanted to use. That being said I ran the same manifolds on the 57 Plymouth from the time I built it. Even with the dual quads the 354 (364 CI with the overbore) ran fine with them. If I was in better shape I’d probably build a set of custom headers for it, but I don’t think my back will let me and the time I’d spend building them will be less time I’ll have to enjoy the car.
.I've NEVER seen a car come from the factory that couldn't be improved..... 
-
05-06-2024 03:38 AM #54
In the process of fitting the manifolds we had to raise the engine a bit.
 install 1 by M Patterson, on Flickr
Raising the motor actually solved some clearance issues. The passenger side valve cover now clears without any issues. It will be close, but I may be able to run the steering shaft straight to the steering box instead of building 2 piece shaft with U joints.
What looks like potential problems in the picture should actually be non-issues. The heater had been removed from the Green car and the hole filled prior to me buying it (I’ll be using an aftermarket heat/AC unit under the dash). I already have the brackets to raise the master cylinder to clear the driver’s side valve cover.
The distributor is a little tight beneath the windshield wiper motor but we're able to easily get it in and out of the engine and 90 degree boots on the plug wires will work.
Of course with raising the motor I now have to raise the frame mounts to compensate and with luck I should be able to do that this coming week.
.Last edited by Mike P; 05-06-2024 at 08:53 AM.
I've NEVER seen a car come from the factory that couldn't be improved..... 
-
05-06-2024 04:40 AM #55
Looks like might need a factory style hemi hood scoop to clear the carb...........it'll be close anyway.Your Uncle Bob, Senior Geezer Curmudgeon
It's much easier to promise someone a "free" ride on the wagon than to urge them to pull it.
Luck occurs when preparation and opportunity converge.
-
05-06-2024 08:49 AM #56
ďÖ..Looks like might need a factory style hemi hood scoop to clear the carbÖ..Ē
Iíve been thinking along the same lines Bob. I really like the way the Pro-Stock style scoop looks on the Green car. Unfortunately itís just not practical for something thatís going to see daily driver duties.
I also like the six-pack air cleaner I currently have on the HEMI. When I built the air cleaner base I didnít build it with drop base, but thatís something I could pretty easily change and maybe lose an inch or so of height. With that air cleaner though I canít move it any more forward because of the AC compressor and it wonít be able to be moved back due to the wiper motor. Basically thereís a good chance that a smaller drop base air cleaner is in the cars future.
I am hoping that I can just use the stock flat hood from the parts car. Thereís a good chance though that the car will need a scoop/bubble of some kind. Much like when I did the scoop on the 57 Plymouth thereís not a whole lot out there that I like. So far Iíve narrowed it down to 3 that I could live with if I have to.
Of those 3 the one I like the least is a Corvette style cowl induction scoop. Their available in both steel and fiberglass and both 2 and 4 inch rise. It would probably open up the most options for an air cleaner however.
2nd on the list is a dodge ďPower-bulgeĒ similar to what the early 70s Chargers/Superbees used. Unfortunately the only way Iíve found them is as a complete hood (but not a valiant hood). Buying a complete hood to cut the bulge out is cost prohibitive and a lot more work than I want to get into.
The one Iím leaning too the most is a Thunderbolt style teardrop scoop. I can get it with or without the holes and screens in the rear. So far Iíve only been able to find it in fiberglass. I actually donít think it would look to bad.
Hopefully the flat hood will clear, but at least I have options.
Iím also open to any thoughts you guys out there may have.
.I've NEVER seen a car come from the factory that couldn't be improved..... 
-
05-06-2024 10:57 AM #57
How about a shaker style, I've always liked those.
-
05-07-2024 09:43 AM #58
"....How about a shaker style, I've always liked those....."
Thanks, I've run shakers on a few cars (and looked some up when I was looking at scoops). On some cars they look great, just not real sure I'd like the looks of one on this particular car.......in a lot of cases I think they would look out of place with the hood open.
.Last edited by Mike P; 05-07-2024 at 09:47 AM.
I've NEVER seen a car come from the factory that couldn't be improved..... 
-
05-07-2024 09:47 AM #59
I personally like the Thunderbolt hood scoop idea. And it being fiberglass you could easily change the height above the hood.
-
05-09-2024 05:38 AM #60
As much as a fan I am of the Thunderbolt scoop, what about an A12 cloned scoop to keep it in the Mopar family?Robert
Welcome to Club Hot Rod! The premier site for
everything to do with Hot Rod, Customs, Low Riders, Rat Rods, and more.
- » Members from all over the US and the world!
- » Help from all over the world for your questions
- » Build logs for you and all members
- » Blogs
- » Image Gallery
- » Many thousands of members and hundreds of thousands of posts!
YES! I want to register an account for free right now! p.s.: For registered members this ad will NOT show


 283Likes

 LinkBack URL
 About LinkBacks
 Reply With Quote

Great to see your new post, Mike, and great to see CHR up and running again after several days of the Hmmm, can't reach this page.... Also good that you found an easy solution to your storage/access...
1968 Plymouth Valiant 1st Gen HEMI