-
04-21-2008 06:04 PM #3286
The horse looks like it's coming along very well Bobby!!!!! Someday I'm going to get something close to done, too!!!!!!


Yesterday is history, tomorrow is a mystery, Live for Today!
Carroll Shelby
Learning must be difficult for those who already know it all!!!!
-
Advertising

- Google Adsense
- REGISTERED USERS DO NOT SEE THIS AD
-
04-21-2008 06:19 PM #3287
Dave thanks buy the way how is the horse you been working on . Last i seen it was allmost done with the frame .
-
04-21-2008 07:47 PM #3288
It's put away in the warehouse for awhile.... Guy doing it, like me, is too busy to put any time in on it.... Maybe next fall we'll be able to get back to it... Originally Posted by bluestang67
Yesterday is history, tomorrow is a mystery, Live for Today!
Carroll Shelby
Learning must be difficult for those who already know it all!!!!
-
04-26-2008 03:08 PM #3289
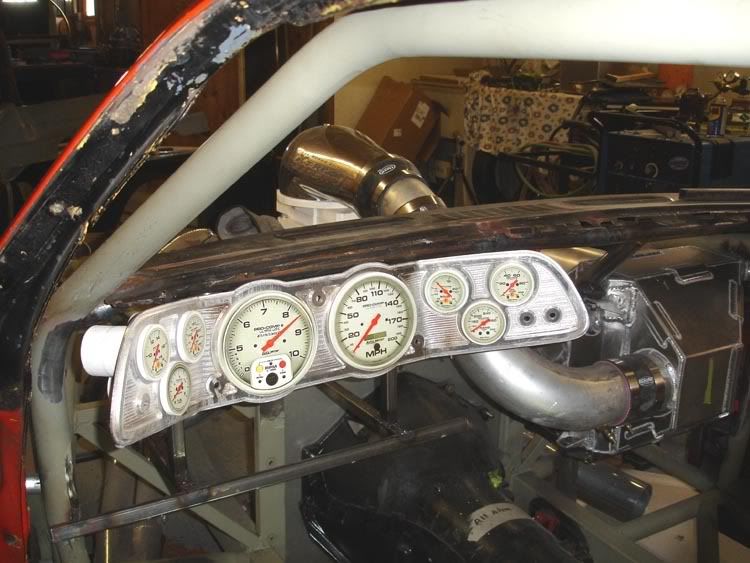
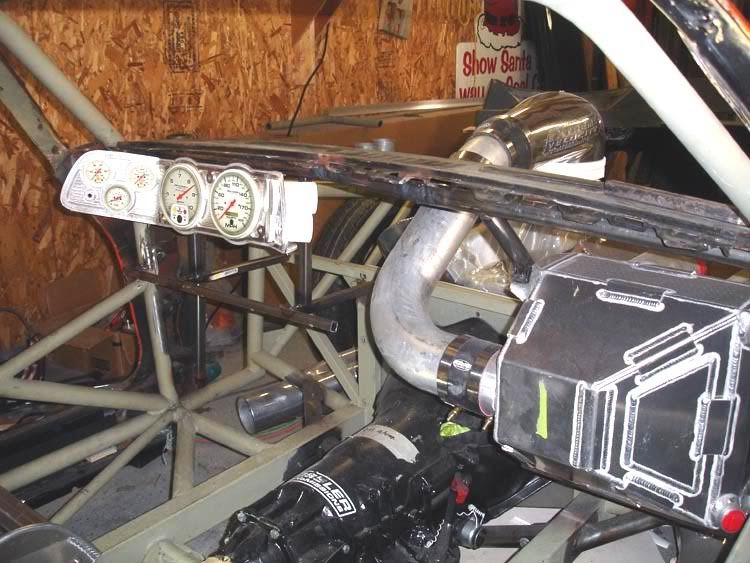
I got a chance to work on the "Z" for awhile today.
Got the dash bezel mounted. It was a pain since I had to tack weld the mounts in with the dash cover in place to keep the bezel in the right location. But, I got-r-done. Might work on the steering column next.


"PLAN" your life like you will live to 120.
"LIVE" your life like you could die tomorrow.
John 3:16
>>>>>>
-
04-26-2008 03:46 PM #3290
Looks great!!!!!! I certainly do like the way you're putting everything together on it Pro, all the extra work and careful planning is obviously going to result in a very well built and super fine detailed Hot Rod!!!! Congrats on all the work, and thanks for keeping us all drooling over your craftsmanship!!!!Yesterday is history, tomorrow is a mystery, Live for Today!
Carroll Shelby
Learning must be difficult for those who already know it all!!!!
-
04-27-2008 07:47 AM #3291
Thanks Dave. The details take a lot of time. But, I don't have to tell you that. You been down that road a few times over the years.
"PLAN" your life like you will live to 120.
"LIVE" your life like you could die tomorrow.
John 3:16
>>>>>>
-
05-02-2008 06:16 PM #3292
I can steer!
Well there a lot of good threads on a single build but I have scattered my stuff around a lot of different threads and taken a year off for writing, but now I am making some progress. Also I was shamed into cleaning up my garage when I saw Ken Thurm's "living room shop" complete with a rug and venetian blinds so I put in some shelves and discovered that my workbench top is really plywood, since I had not seen it for several years. Before I go on I note that the wrenches arranged in order are the way I have worked for many years so that is not a fake arrangement; I just like to find the wrenches by size. Also I note that I have probably put a lot of my earlier stuff on this thread several years ago so I guess it is OK to continue with new stuff here. The occasion is that I have stewed over a year worrying over installing the steering column and switched from a straight '80 Camarro column to a Brookville tilt column last year and then messed it up with scratches and ended up painting it three times. I still scratched it again but I am tired of repainting it so I hope some of the new polish tricks can fix the scratches. Then there is a recent thread on powder coating and I have had my Speedway aluminum wheel powder coated "clear" to give an almost luminous appearance. I had to use a flat wheel to allow possibility of entering and exiting the tight '29 cockpit so I got the zero-dish racing wheel from Speedway and it is only 13" in diameter which also gives me a bit more room, but still It is going to be tough to enter/exit the '29 when the 2" chopped top is up but I am moving ahead anyway. Actually the installation was a nightmare of trial and error but I got better with every try and some help from Spike Allen at nearby DanKel Engineering for some clean and simple machining. Then there was another thread where Tech1 defined the specs for an approved steering column. I have to farm out welding so I went with a suggestion from NTFDAY to use a castle nut fastening. I found that I could get a bolt of the correct thread with a cotter pin hole from Brattons Antique Auto parts by using the bolts that are meant to bolt the Model A transmission to the cast iron bell housing. They allowed me to not only pin the steering shaft extension but also to thread the bolts through the set screw threads AND add the castle nut with the cotter pin. Some folks prefer welding but I needed to cut and fit several times before I got it right. Here is a picture of the universals and the shaft showing the castle nut pinning.
Don Shillady
Retired Scientist/teen rodder
-
05-02-2008 06:22 PM #3293
I forgot to attach the picture so here is the pictrue showing the pin-through
with the threading and the castle nut.
Don Shillady
Retired Scientist/teen rodderLast edited by Don Shillady; 05-02-2008 at 07:37 PM.
-
05-02-2008 06:25 PM #3294
Those look allot like the flaming river joints delivered to my door today."PLAN" your life like you will live to 120.
"LIVE" your life like you could die tomorrow.
John 3:16
>>>>>>
-
05-02-2008 06:30 PM #3295
Next after a lot of thinking I decided to put it all together and slide it through the firewall and line it up on the pinion shaft. I might as well admit this is the third shaft length tried, but my son held the big end of the column with the horn wire hole at 10 O'clock while I tapped the other end on the pinion. With his help and thinking about it for over two months we got it right to within one tooth on the pinion spline and I don't plan to change it at the pinion end again. Plenty of "extreme strength" loctite was used on all the fittings. (You can see shaft-1 which was too short next to the screw drivers. Shaft-2 was destroyed when the machinist did not tighten the vice enough in the milling machine; he is human too!)
Don Shillady
Retired Scientist/teen rodderLast edited by Don Shillady; 05-02-2008 at 07:16 PM.
-
05-02-2008 06:42 PM #3296
Now we were on a roll after a frustrating six weeks of messing around so I installed the Grant wheel kit with the zero-dish racing wheel from Speedway. You can't see the front but it has "corncob" knobs in the front side for fingure grips and they are shiny. The whole wheel was coated clear powder coating but I think I will have to scrape some of the aluminum under the horn button for electrical contact. Today I just wanted to get it all together and check out the alignment of the front wheels and to see if it would "steer"; it does! I wanted the "Y" of the three spoke wheel up top to allow for a speedometer in the dash right in front of the wheel. The luminous aluminum-silver of the wheel contrasted to the metallic maroon paint looks good to me!
Don Shillady
Retired Scientist/teen rodderLast edited by Don Shillady; 05-02-2008 at 08:14 PM.
-
05-02-2008 06:44 PM #3297
Nice work Don, real pretty to look at......AND properly done.
PLANET EARTH, INSANE ASYLUM FOR THE UNIVERSE.
-
05-02-2008 06:52 PM #3298
Gary, that windshield bar looks like it might have come stock on the car. If you're not lookin' for it, you don't see it. Niiiiiiiiiice.
PLANET EARTH, INSANE ASYLUM FOR THE UNIVERSE.
-
05-02-2008 07:04 PM #3299
Maybe I have made too much out of this, but I ought to get get credit for not saying the thousand bad words I have thought about this frustrating trial-and-error alignment. IC2 was worried about difficulty turning with a small wheel but it turns easily, maybe due to the radial tires on the front. This last picture might look like the wheel is too high, but when I sit in my pride-and-joy $15 Dodge van seat the top of the wheel just comes to the edge of the bottom of the windshield so visibility is not impaired any worse than by that bulbous windshield wiper motor. I wish I was handy enough to put the wiper motor in the cowl but that looks too hard for my limited skill.
ProZ, those universals were ordered through SPEEDWAY and a hole was drillied on the opposite side of the set screw threaded hole so that the cotter pin 5/16" bolt can go through the shaft (with slathered loctite) through the set screw threads (more loctite) and then fastened further with the castle nut (loctite again) and a cotter pin. My goal is to gain VA state inspection AND NSRA inspection but there is no intention to race this detuned 350 now; I am even going back to 1.5 rockers on the intake valves so for your interest I will have specs just slightly better and the same cam as the '77 Z28.
Thanks a million Tech1! I rely on you for safety tips!
That's all folks!
Don Shillady
Retired Scientist/teen rodderLast edited by Don Shillady; 05-05-2008 at 10:14 AM.
-
05-02-2008 08:01 PM #3300
Thanks Richard. That is about the only place I could put it. The gauge bezel and dash don't leave but about 1/4" tolerance. But it does fit. Originally Posted by techinspector1
Don your project is looking good. Really coming together nice."PLAN" your life like you will live to 120.
"LIVE" your life like you could die tomorrow.
John 3:16
>>>>>>
Welcome to Club Hot Rod! The premier site for
everything to do with Hot Rod, Customs, Low Riders, Rat Rods, and more.
- » Members from all over the US and the world!
- » Help from all over the world for your questions
- » Build logs for you and all members
- » Blogs
- » Image Gallery
- » Many thousands of members and hundreds of thousands of posts!
YES! I want to register an account for free right now! p.s.: For registered members this ad will NOT show


 188Likes

 LinkBack URL
 About LinkBacks
 Reply With Quote

Make the most of another birthday my friend.
Happy Birthday Mike Patterson