Thread: Project Special K
-
02-09-2009 04:25 PM #256
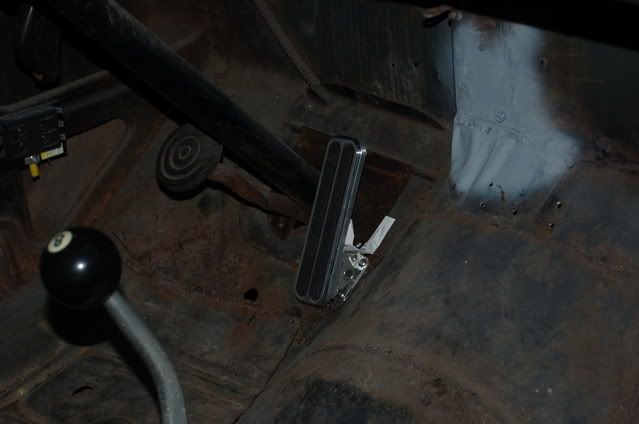
Lokar petal went in today. It seemed like it would be easy but took a trip to hardware store for longer screws and several hours later I finally got it in. The hole for the linkage and drilling the screws was the easy part, trying to get them into the base plate under the floor board was a different story. There must be at least three layers of metal in some spots, all kind of tweaking each screw. Anyway it feels good to have it almost done, just need to mount the cable when it comes tomorrow. here is a couple of shots, with a piece of paper propping it up, since it isn't hooked up to the engine. I also cut a few scaps of sheet metal to fill the gaps around the brake petal and steering column.


"  "No matter where you go, there you are!" Steve.
-
Advertising

- Google Adsense
- REGISTERED USERS DO NOT SEE THIS AD
-
02-14-2009 10:47 AM #257
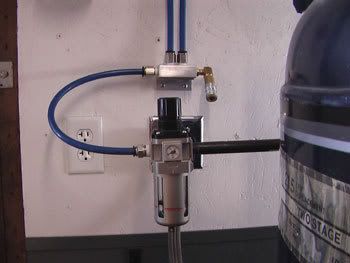
Well despite rain, I'm making headway. I got my accelerator linkage and transmission kick down cables from summit, finished installing the accelerator, and have been researching plumbing an air supply to my compressor, purchased a setup from Rapid Air, that includes a water trap, so when I can get at painting the truck, there hopefully be no contaminates to muck it up.

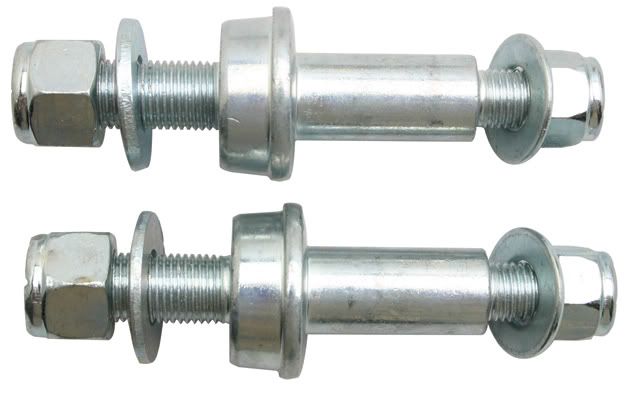
With lots of help from all of you, I feel confident enough to give it a try this spring. I also found some shock mount pins that can bolt to one side of the rear shock mounts on my 9" Ford F100 axle's existing shock mounts(i.e. no cutting and moving) that will allow the shocks to line up with the axle better to where they won't rub againt the frame by the upper mounting bolts! see photo below:

I also have given up on waiting for my friend to weld in the motor mounts( 2 months no return phone calls) and will now do it myself. The mounting kit is pretty straightfoward, and though my welding skills are not the best, the kit is a bolt on and suggests welding in addition for extra strength, but it is not necessary, so bolted and welded by me should be fine!
I'm also wondering about boxing in the frame some more for added strength and wondered if any of you has any idea of what stock to use, and if behind the cab, an x mount above the drive line to the back part of the frame near the differential will be adequate?Last edited by stovens; 02-14-2009 at 10:54 AM.
"  "No matter where you go, there you are!" Steve.
-
02-14-2009 08:19 PM #258
10 ga. steel works quite well for boxing in frame rails. Always buy mine from a steel supply house in Sioux Falls. They do a lot of cutting for various projects, and usually have a pile of 10 ga. cutoffs about 8" to 10" in width and lengths of 4' to 5'. Becuase they're cutoffs from a shop work order, I can by them at a huge discout compared to the price of a full sheet, usually about half price.....Yesterday is history, tomorrow is a mystery, Live for Today!
Carroll Shelby
Learning must be difficult for those who already know it all!!!!
-
02-14-2009 08:32 PM #259
Dave do you cut these down narrower or bend them? I'm just new to metal work. Flat sheets or tubing? Angle iron? Help!
"  "No matter where you go, there you are!" Steve.
-
02-14-2009 10:55 PM #260
I use flat sheets cut down to the size of the frame rail.... You can cut them to fit either the outside of the rail edges, or on the inside of the rails and recess them in 1/2" to 3/4". This makes a nice protected area to mount fuel lines and electrical wires were they are protected and for the most part out of sight to a casual look. On the Plymouth, I'm mounting the boxing plates flush to the outside of the rails. The frame has numerous tapers and bends so flush mount is a bit quicker and easier. I'll get you some pics of the frame before and after the boxing plates are installed. You can kind of see on the pics I posted in the "Everyone currently building......" thread today....Yesterday is history, tomorrow is a mystery, Live for Today!
Carroll Shelby
Learning must be difficult for those who already know it all!!!!
-
02-15-2009 11:38 AM #261
Dave thanks. It's funny how terms we hear everyday get mixed up in my brain! When I heard guys on this site mentioning boxing in the frames I always thought of cross members being added from one from rail to the other! Now I get it. It is closing off the three sided frame rail with a single sided piece of sheet metal. I found a place that has precut boxing peices today for 95 bucks a set, whick will work great as my cutting skills are worse than my welding skills
The sell separate front and back rail sets or complete sets for the whole length of frame. So the next question is drilling access holes for bolted areas and also what are your thoughts about the need for cross members in back from say behind the cab to the rear axle?"  "No matter where you go, there you are!" Steve.
-
02-15-2009 06:07 PM #262
Steve, you'll for sure want crossmembers for the seat bolts to go thru. I do it this way so that I can use thinner (20ga.) steel for the floor. Being thinner it's lighter and easier to work. When doing the crossmembers, try to work in an X or two for bracing. An X is still the strongest shape for strength. If an X doesn't work well into the structure, a triangle is the second best choice. Also, with an X or two again you can use smaller sized tubing for the X-members. I use 1" X 1 1/2" rectangular or 1 1/2" round. Have to finish up installing the boxing plates and start on crossmembers for the Plymouth frame this week, looks like we're about the same place on frame work though I still have to fit the engine and transmission and build some mounts.....
For body bolts, you have a couple options. either leave a notch in the boxing plate where the body bolts go and install a piece of channel between the frame and the boxing plate where the bolt goes, or weld a nut on the inside of the frame rail where the body bolt goes, then install the boxing plates.....Yesterday is history, tomorrow is a mystery, Live for Today!
Carroll Shelby
Learning must be difficult for those who already know it all!!!!
-
02-16-2009 12:54 PM #263
You know that's not a bad idea we have two steel places locally, and cutting the templates would be pretty straight foward, for a steel place. It just seemed to me when we purchased some scrap for our house addition, that it cost a fair amount of cash for some small scraps. But I just called a scrap yard and they sell it for about 90 cents a pound! I figure your right I could save a bundle. The company that makes the precuts also makes tubulat x frames for my setup, but again its 400 bucks for the x-frame and 100 to ship.so maybe I'll get creative!"  "No matter where you go, there you are!" Steve.
-
02-16-2009 08:13 PM #264
Finished the boxing plates for the Plymouth, Steve. Cost of the materials I mentioned in the earlier post was $37.00. I do the same as Evolvo on the templates, for cutting it depends on the piece and the size. Sometimes I use the plasma cutter, sometimes the Sawzall, and sometimes the jig saw. For straight pieces I use a cheapy table saw with a half used up cut off wheel from the chop saw. It seems with the chop saw when the cut off wheel doesn't have enough material left on it to cut through a 2" or 3" piece of steel tubing, there's about 9" to 10" of it left....With an adapter for the center, just the right size for my table saw!!! Nice straight cuts, Just gotta be careful with it....Yesterday is history, tomorrow is a mystery, Live for Today!
Carroll Shelby
Learning must be difficult for those who already know it all!!!!
-
03-09-2009 04:19 PM #265
Got excited today, clear weather, dry, and friends in town to help drop the motor in! Went out in the garage got the motormounts out, bolted one on, and then.... "jeeze these look exactly the same for both sides!" CPP sent me two passenger side motor mounts! Like an idiot I gave the guy who bought the old engine the old mounts. So a few phone calls later, I confirmed no engine will be going in today! No mounts locally to be found, three days to get the driver side one from CPP. Disappointed yes, but while Mike was in town I had him help me rebleed the brake lines so that was a plus, and I painted the engine mounting bar as it was only lightly painted from the factory. I also spent considerable time contiplating the transmission mount that I also ordered to see if it will fit by the brake booster and original crossmember that the brake master cylinder bolts onto. Long end of it is I'll have to drop the engine in and see where the transmisson lines up with it, to figure out where to connect it. I generally don't like to unpack stuff until I need to use it, as I hate losing stuff, but the moral of this story is always check that you got the right stuff the first time around!"  "No matter where you go, there you are!" Steve.
-
03-10-2009 06:37 PM #266
No parts yet today, so I worked on the 93 Toyota truck. It just plunks along, like a neglected friend, never asking for much. So I treated her to new plugs and rotor and cap. New air cleaner too. I think tomorrow I'll pick up new wires as the old ones are soft and thin, not to mention have 175k on them. It's a simple engine to work on, and has required little attention since we bought it in 1993. I also put a bottle of Chevron Techron injection cleaner in with the half tank of gas to clean the injectors out.
No progress on the truck other than the alternator bracket arrived from summit late this afternoon. I also got a summit starter for it that is a smaller size and works up to 12:1 compression engines so no problem with my mild build. My neighbor said he'd be around this sunday to help out if needed on putting the engine and tranny in. The motor mount should get here tomorrow, so with luck it will be a go this time around!
"  "No matter where you go, there you are!" Steve.
-
03-12-2009 12:37 AM #267
Opened the mail today and my motor mount arrived. I think we are now looking at the best two out of three. I now have three passenger side mounts and no driver side. So another call to Classic Performance, another round of explaining, then some pictured emailed to them, and what do I get, you must have a left mount on your right side, cause we sent you the right one. After a few more who's on first what's on second discussions, I had him send a photo of the opposite mount. After confirming I needed a right mount for the left side(just give me the one in the photo you emailed me, I don't care where it goes or what it's called, and I'll send the other two back!) they said it should get here before the weekend, hope so, cause I'm gone for two weeks, before another day off, after this weekend! Sometimes words just don't cut it!

"  "No matter where you go, there you are!" Steve.
-
03-12-2009 05:03 AM #268
Kind of like getting a left and the other left when what you wanted was a left for the other left and the other right, right???Yesterday is history, tomorrow is a mystery, Live for Today!
Carroll Shelby
Learning must be difficult for those who already know it all!!!!
-
03-12-2009 10:40 AM #269
That about sums it up Dave! Well it will get in there eventually!
"  "No matter where you go, there you are!" Steve.
-
03-24-2009 07:51 PM #270
Just back from a week off in Flagstaff. Upon going thru my mail my motor mount was finally here and appears to be the right one! Now just need another block of time off!
"  "No matter where you go, there you are!" Steve.


 379Likes

 LinkBack URL
 About LinkBacks
 Reply With Quote


Friday and Saturday (4/11 & 12/25) Chris (my wife) and I made the journey to Homestead-Miami Speedway so I could participate in the Florida Power & Light sponsored Electrathon event.:cool: It was...
Electrathon - A Different Kind of...