Thread: Project Special K
Hybrid View
-
09-20-2012 06:09 PM #1
behind the front seats! Talk about weight distribution!!! LOL..
-
09-20-2012 07:40 PM #2
Naw just hook Pretzel up, he will pull yah where you need to go, one dog power!"  "No matter where you go, there you are!" Steve.
-
09-21-2012 02:37 PM #3
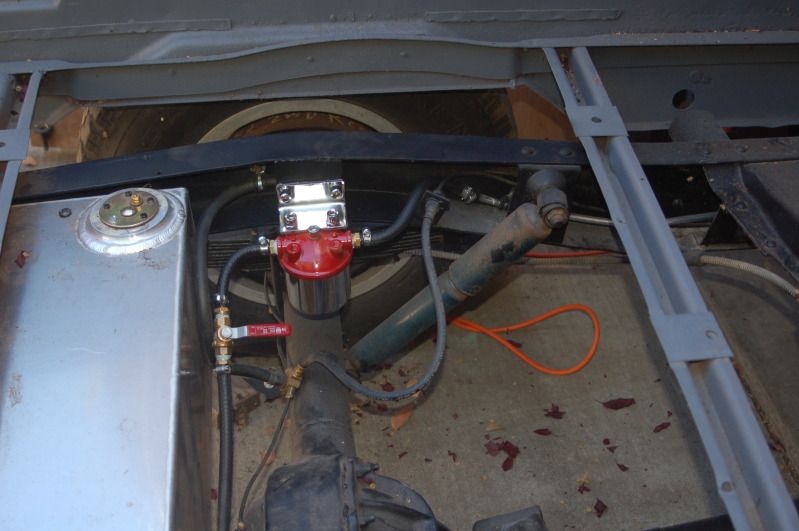
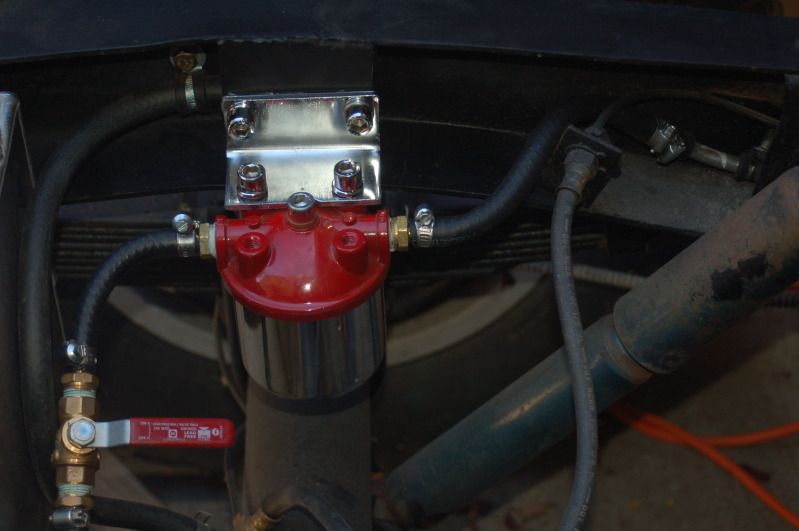
Worked on moving the fuel filter back by the tank today, figure I'll tackle all the stuff that will impede getting the engine in, once the pulleys arrive. So I carefully welded a mounting plate to the frame(since it's fairly close to the gas tank, and then replumbed from there. Looks a little like spagetti with the transaxle breather hose, brake lines and fuel line. Decided to put the gas shut off valve before the fuel filter to make changing filter, and cleaning easier(thanks whoever gave me that idea a while ago! Pretty pleased with placement, clears drive line enough not to worry about hiting the axle with the fuel filter, and enough height clearance to get at filter with allen wrench.


"  "No matter where you go, there you are!" Steve.
-
09-21-2012 05:00 PM #4
That ought to work! Always nice to have the fuel system components near the tank, makes servicing things a lot easier!Yesterday is history, tomorrow is a mystery, Live for Today!
Carroll Shelby
Learning must be difficult for those who already know it all!!!!
-
10-06-2012 11:07 AM #5
Well I got back from a week in Vermont(what a beautiful state)and went back to work this week. Knee held up well to the concrete floors at the hospital! In the mean time, my pulley set arrived and should work nicely. I ordered a new shifter after lots of thoughts about how much space the B&M cable shifter was taking up. I went with a Lokar 23" Nostalgia transmission mount with linkage setup. I think the 23" height of the shifter handle will be just about right with the stock seat setup. I got a double bend shifter shaft, so hopefully the knob won't end up in someones lap! I think that this set up gives me enough front to back alignment choices that it should work with the cab and fit in where I want it. It takes up relatively little floor space so a third person should fit in the cab now. And lastly, I am hoping adjusting it from park to drive to neutral and reverse will be easier than the cable shifter, which just never seemed to work in all of the gear choices, so if anyone has a c-6 and wants a B&M truck cable shifter, let me know, I'd be willing to practically give it away knowing it was going to good use for someone. A friend is down for the weekend so many I can entice him to help fit the motor in, and weld in the mounts. Then it will be time to play with the tranny!
Last edited by stovens; 10-06-2012 at 11:09 AM.
"  "No matter where you go, there you are!" Steve.
-
10-06-2012 01:48 PM #6
-
10-06-2012 02:29 PM #7
Thanks. Spent the last three hours finessing the engine and mounts around with the header clearance on driver side to clear steering box and pulley clearance in front to avoid cross member. I think it's close enough right now that I can tack weld in place and then pull engine and bolt and weld in place permanantly. Just have to read back on the right pitch angle of the engine measured from on top of the intake manifold."  "No matter where you go, there you are!" Steve.
-
10-06-2012 02:55 PM #8
Right now the engine is at about 4-5 degrees sloped back towards the fire wall. Will try and finess it to 2-3."  "No matter where you go, there you are!" Steve.
-
10-06-2012 05:52 PM #9
Well I got the mounts spotwelded and bolted in place, pulled the engine out and cleaned up. Now have to get everything fully mounted and pray it all works. Agood day. One step closer!"  "No matter where you go, there you are!" Steve.
-
10-06-2012 05:58 PM #10
That is what it takes.. one day / one step at a time. Keep up the good work!
-
10-06-2012 06:42 PM #11
hate to say this to you but that fuel filter should be moved if truck is not finish by the time its done truck can drop a 1 inch or more .then a full tank of gas .bed floor . driver etc...wheel hop . spring whined up and its not hard to see 3 inch s of travel get lost fast you could flip the bracket that will get you a 1 inch abit more but over the axle is a bad spotLast edited by pat mccarthy; 10-06-2012 at 07:01 PM.
Irish Diplomacy ..the ability to tell someone to go to Hell ,,So that they will look forward to to the trip
-
10-06-2012 07:49 PM #12
Thank s guy. Pat the leaf springs on there right now are old, but new stronger springs are waiting to go on. Also the picture doesn't show the clearance well, but it is significant enough to prevent it from bottoming out. I will keep an eye on it, encase I'm wrong(i.e. I appreciate your alert!)"  "No matter where you go, there you are!" Steve.
-
10-07-2012 11:21 AM #13
Steve,
Not trying to jump on you at all but two things jumped out at me from your picture. First, I agree with Pat that directly above the axle is not a good place for that fuel filter, regardless how much clearance you think you have to spare. An unexpected trip through a ditch or over a curb at speed might change a bumpy ride into an inferno - not a happy thought. Second, your shocks seem to be leaned forward a bunch! I know that someone posted a neat link about how the angles affect response, but absent that I found this little table that seems to be about right:
shock angle.jpg
In your discussion on tacking your motor mounts, do you have your engine and tranny bolted together as a unit so you can set your drive line angle and deal with all clearances at once? I would think it would be a lot easier to triangulate supports with the pieces joined, allowing you to establish not only the motor mount locations, but the tranny cross member, too, all with the chassis at ride height?Roger
Enjoy the little things in life, and you may look back one day and realize that they were really the BIG things.
-
10-08-2012 08:06 AM #14
I think that discussion may have been us on the 67 to 72 truck board Roger, the `64 to 66 and actually up to the`72 GM trucks are notorious for for bad shock angles, stock height without load they are 38 degees, lower it and it drops to 42 degrees, put a load in it its worse, this all came about while I started my rear tank install. Time to move them to the out side. Steve might benefit from another shock if he relocates Monroe part number 32207 or the kyb 343144 ..these are both shorter shocks if moves them to the outside of the frame rail..sorry if I hyjacked this thread... http://www.monroe.com/assets/downloa...engthSheet.pdf
http://www.kyb.com/technical/documen...onsSecured.pdfToys
`37 Ford Coupe
`64 Chevy Fleet side
`69 RS/SS
`68 Dodge Dart
Kids in the back seat may cause accidents, accidents in the back seat may cause kids, so no back seat, no accidents...!
-
10-07-2012 05:29 PM #15
I hear what you and Pat are saying. Worth a few minutes to relocate vs. problems down the line. The shock angles are stock but will change when I put on the new shock mounting plates, the tranny is going to be almost the the exact same angle as before, though I will have to extend the rear support about an inch. My biggest fear is the steep incline of the rear differential. It slopes down quite a bit in relation to the leaf spring perches. A few people have said not to worry about this, but it seems a bit exagerated of an angle downward. I have a friend who is a mechanic, that will give it a looksy before I put on the new rear leaf springs. Thanks again Pat and Roger. It's nice to have people keep an eye out for those of us new to this rodeo!"  "No matter where you go, there you are!" Steve.


 379Likes

 LinkBack URL
 About LinkBacks
 Reply With Quote
 Good to hear your parts have arrived and am excited for you in getting them in there...


Friday and Saturday (4/11 & 12/25) Chris (my wife) and I made the journey to Homestead-Miami Speedway so I could participate in the Florida Power & Light sponsored Electrathon event.:cool: It was...
Electrathon - A Different Kind of...