


Thread: Cloth Roadster Tops


Results 1 to 15 of 17
 LinkBack URL
 About LinkBacks
Hybrid View
-
02-01-2008 02:09 PM #1
 CHR Member

- Join Date
- Sep 2007
- Location
- UPSTATE New York
- Posts
- 4,336
 Originally Posted by C9x
NO! NO! NO! NOT ANOTHER PERSONNA (Dave - get hold of yourself - it's just an Anonymous moniker) Phew
I'll give my upholsterer a call early next week - I owe him a call anyhow and find out exactly what he used.
I originally bought L-B's entire $15 fabric sample kit and really tried to use one of their products until I finally settled on the material my top is made from. After all, L-B are only about 200 miles from me, and I've been in their shop several years ago when I was commuting to Maine for my job. Their material is very nice - so anything I say about my choices is prejudiced.
As a note, L-B, while easy to deal with, tend to be slow shippers - so order as soon as you can. But - with that said, their top irons are the best and the least expensive, regardless of the fact that they were most likely made by Girtz, who supplies most of the 'A' after marketDave W
I am now gone from this forum for now - finally have pulled the plug
-
02-02-2008 10:53 AM #2
CHR Member
- Join Date
- May 2004
- Location
- Ashland
- Car Year, Make, Model: 29 fendered roadster
- Posts
- 2,160
C9x, Thank you very much for your detailed description, it is very helpful. One piece of good news is that I looked over my stainless top irons (they are beautiful!) and to my relief they are marked in crayon with my name AND marked "2" chop", so whew and hoo-ray, I already have the chopped irons along with the windshield. However I note the round holes in the front of the irons want the stanchions to be vertical while mine are tilted back about 10 degrees so maybe a bit of a twist in a vise will be needed. I did call the Lebaron Bonney phone number and the lady there said they do not offer a chopped top for the '29 Ford, implying that they did for later roadsters. So the question is whether if I use the straight-up rear part can the bottom edge just be cut off and the snaps or stables be moved to the new bottom edge? It would seem so but may bring the trimmed edge of the side forward several inches. That would be OK with me since I would like a little more side vision than is available from the blind sides and maybe a smaller lexan quarter window could be added. I like the look of the '40 Ford convert with no rear side windows from the outside but from the drivers position that creates a blind spot. I have to say that I am cruising along on experience and confidence gained from building several spectrometers from scratch in my career but I am pretty much a "bolt-on" mechanic with a rat-tail file and some of the folks on this Forum like C9x, DennyW and Bob (to mention a few) are way, way ahead of me in the skills needed for a total build. I will try to get a picture of the red Shay I saw but I looked at the top bows and since it was rolled over I think they rebuilt the bows from motor boat top frames. That shop does a lot of boat tops as well as cars. I got the impression that they do very good work but prefer to "do it their way" at $70/hr. Prior to this I also had the top on my Sunfire repaired and talked to a different shop about the roadster top. I think I will ask around and see if that shop will install a Lebaron Bonney top with my chopped bows for less and still have the experience of a person who installs tops day in and day out. One thing that worries me is that when the "supposedly chopped" irons are on the stanchion posts, the irons look too low, I will try to get a picture. Thanks again C9 and if IC2 finds some pictures I would like to see them too.
Don Shillady
Retired Scientist/teen rodder
-
02-03-2008 01:18 PM #3
CHR Member
- Join Date
- May 2004
- Location
- Ashland
- Car Year, Make, Model: 29 fendered roadster
- Posts
- 2,160
C9x and IC2, This is a valuable thread which I have to study more. Overnight I got to thinking that I could/should mount the top irons the way C9x said he did and put tape over the outline. Then I can decide which shop can do the final cloth installation and make the side curtains. As I said I am a little concerned that my stanchions tilt back slightly and the top irons have a corner angle with a verticle pipe section welded in for a "Flat" fit so with a mock up of the irons I can tweak this to fit before the cloth is added. If after all I end up with the straight-up back shown in the pictures that is OK, but maybe a slight displacement of the screw holes in the back bow can add slight forward lean. In any case it looks to me that a standard Lebaron Bonney '29 top should be able to be trimmed at the bottom edge with almost no change except in height.
Don Shillady
Retired Scientist/teen rodderLast edited by Don Shillady; 02-04-2008 at 08:29 AM.
-
02-03-2008 04:33 PM #4
CHR Member
- Join Date
- Dec 2004
- Location
- N/W Arizona
- Car Year, Make, Model: Deuce Highboy roadster
- Posts
- 1,174
i'll just add, another good reason to install your back window yourself.
And . . . don't cut the window out of the cloth until you're near the end.
Clear?
Install the window frame complete with glass/Lexan.
Complete the top install.
If you're happy with the top, then cut the window out.
You may or may not be able to move the window after the install.
I has 6-32 screws if I remember right.
The hole they make is small and my thinking is they may close up if the window is moved.
Use an awl to make the holes for the window and the cloth will be displaced and not removedlike it would be if you drilled - a perhaps dangerous thing to do far as damaging the cloth goes - or used an Arch Punch.*
*also known as gasket paper hole makers....C9
-
02-11-2008 02:41 PM #5
CHR Member
- Join Date
- May 2004
- Location
- Ashland
- Car Year, Make, Model: 29 fendered roadster
- Posts
- 2,160
C9x, In your new roadster you have a red Mopar seat and that is where I got the idea. I really like my red seat but it goes back into the corner of the '29 cockpit pretty tight. You have a little more space in your '30 but even so the seat looks pretty tight in the back corners. The reason I am asking is that I have greatly admired your roll bar in the '32 and would interested in whatever plan you have or comments about the possibility or plans for a roll bar in the new roadster. I don't see any easy way to cut into the corner of the seat without a total recovering afterward but you are very clever and may have an idea.
Don Shillady
Retired Scientist/teen rodder
-
02-12-2008 08:03 AM #6
CHR Member
- Join Date
- Dec 2004
- Location
- N/W Arizona
- Car Year, Make, Model: Deuce Highboy roadster
- Posts
- 1,174
Originally Posted by Don Shillady
Actually, the 28 thrugh 31 A roadsters have virtually the same size cockpit - as does the 32.
As noted, I have measurements from an article I did for the HAMB 12-18 months ago.
The seat is from a mid-90's soccer Mom van
It is the genuine two passenger model.
Reason I point it out is, at times you’ll find the three passenger seat in the middle, there are mounting points for both.
Note that the folding armrests will fit and operate and if I do the same roll bar setup they will probably fit with the roll bar.
I don’t have any good close-ups of how the roll bar vertical piece goes, but the seats in the 32 are foam on veneer 3/4" plywood and the foam was cut to fit.
This pic combined with the interior shot of the 32 above may give you an idea.
Note as well the main hoop has a shallow angle bend just at the seat level.
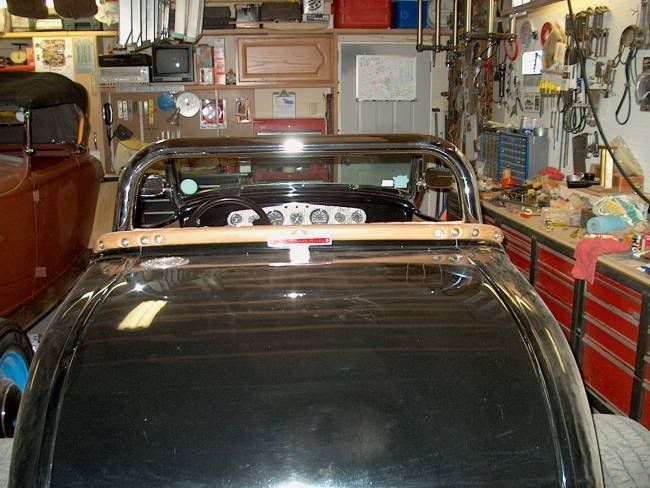
Done for aesthetics, but its worked well with top on etc.
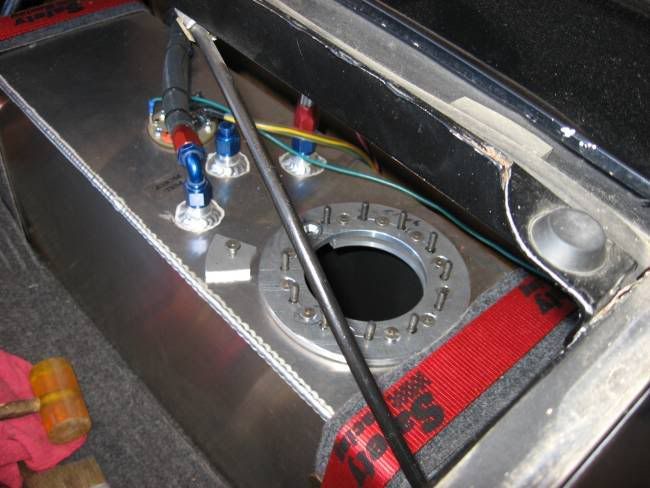
This pic shows the trunk interior and how the four point setup goes.
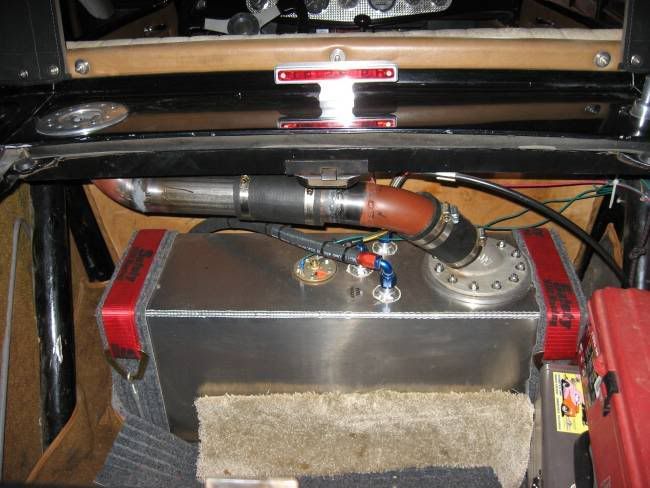
The roll bar is only chrome plated on the upper part.
There is a full .090 aluminum sheet firewall between seat and fuel tank.
Not shown here because it was out for the fuel tank install.
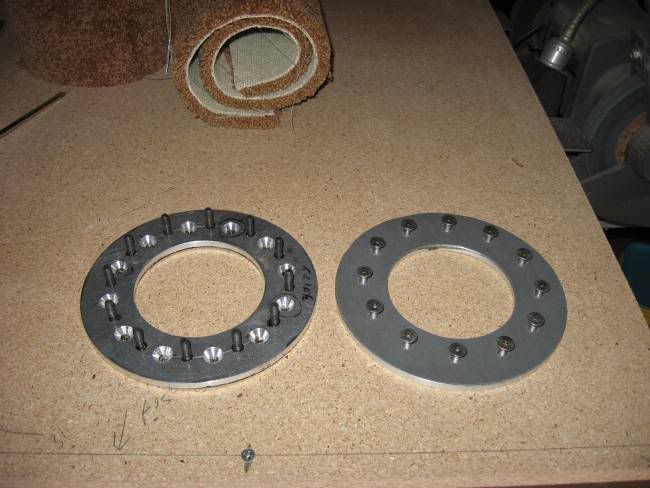
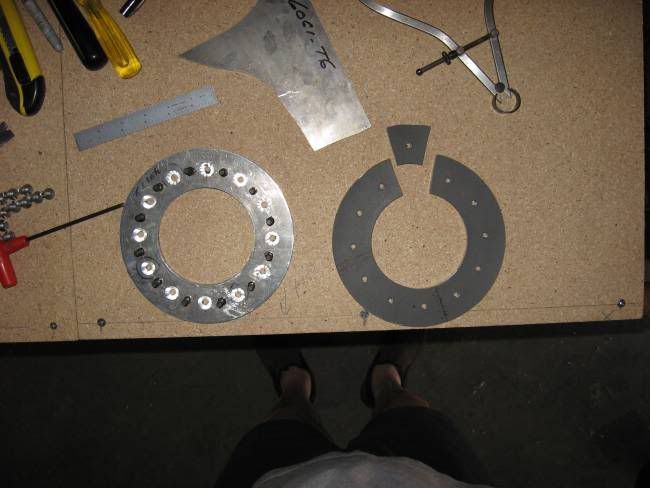
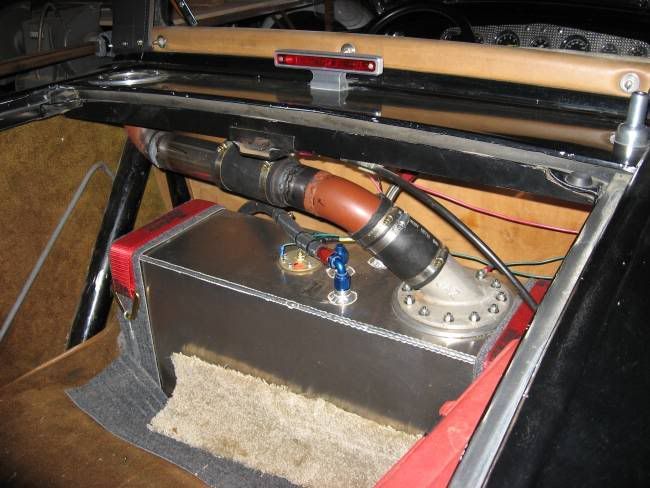
I recently replaced the JAZ fuel cell that was - and always had - weeped at the full filler juncture.
These pics show the rings I made up to cure the same - and worse - problem with the Summit fuel tank.
(Also a complete article on the HAMB.)
Roll bar is 2 ½" x .120 DOM tube.
The bars have 1/4" mounting plates welded to them, two 1/2-20 bolts each plate.
Grade 8's.
They bolt to machined 1 3/4" x 2" x .3/4" thick backup pieces that have a step machined in to fit into a 1" hole in the frame so the fit is flush.
They are also TIG welded at the 1" hole.
Make up a jig with 3/16" or so holes to match the roll bar mounting plate bolt spacing.
Drill the frame with the pilot drill, remove jig then enlarge with a 1" drill.
The stepped and threaded frame weld bungs are then installed.
It will help in the installation of the bar after welding is complete by drilling the mounting plates a 1/32nd over the ½" mounting bolt size.
You’ll want to tack weld the roll bar plates to the tube with the plates bolted to the frame.
Then tack the rear bars to the main hoop with 6-8 strong tacks.
Remove roll bar for finish welding.
Clamp a sturdy piece of angle to the mounting plates to help stop distortion of the main hoop when the straight tubes get welded to the main hoop.
After finish welding you’ll probably have to spread the main hoop a touch in or out transversely depending on which way the hoop went during the welding process.
This shot shows the roll bar hoop and short straight pieces.
The short straight pieces have a long fishmouth that butts precisely up to the main hoop verticals.
In years past, this is all the drag racing organizations required for competition use.
It did pretty well, but as speeds in a class got higher I understand some of them folded up.
Granted, a roll cage would be better, but for the lower speeds involved in street use it should do ok.
The bigger tube has considerably more strength than the typical roll cage tubing of 1 5/8" or 1 3/4".
I’m pretty sure the machined, stepped weld bungs in the 32 won’t pull out.
Even so, this time around I plan to make some 1/4" thick inside the frame reinforcing plates with their own threaded weld bungs.
The 1/4" plate won’t be threaded, but the threaded weld bungs will have a minimum of ½" threads.
That should be sufficient to capture the full strength of the mounting bolts.
My research shows that full strength of threads is developed by having the nut - or weld bung - at least as deep as the bolts OD.
Hope all that’s clear....Last edited by C9x; 02-12-2008 at 02:57 PM.
C9
 Reply With Quote

Posting Permissions
- You may not post new threads
- You may not post replies
- You may not post attachments
- You may not edit your posts

Sorry for your loss of friend Mike McGee, Shine. Great trans men are few and far between, it seems. Sadly, Mike Frade was only 66 and had been talking about retirement for ten years that I know...
We Lost a Good One