Thread: Cloth Roadster Tops
-
02-01-2008 08:19 AM #1
Cloth Roadster Tops
A little different for a new post since the question was asked in another post, but I thought having one under the subject of tops would help keep it form getting lost and other folks could chime in.
Taken from the post on 32 Ford roadster windshield pulls by Don Shillady
My comments in blue.
C9x, On some other thread you advised getting a Lebanon Boney top with the idea of self installation. Today I visited a top shop here in Richmond to check out a beautiful '29 roadster that was brought back from a 1929 Shay replica that had been rolled over. It is now a beautiful fire engine red with a custom black top and side curtains but since it is based on a Shay it still has the Pinto engine and a Mustang II front end. Anyway that shop certainly does very nice work and I will take a summer teaching job to pay for a top/installation this summer
For ease of typing the 28-29 Aís will be noted as 29's and the 30-31's noted as 31's.
32's need no explanation.
Keep in mind the cockpits of the 29 and 31 Aís as well as the 32 roadster is virtually the same.*
Measurements in all areas are very close with the main exception being the depth of the 32 cockpit being 2" deeper.
One reason why the Deuce gang seems to sit a little lower in their cars.
Even so, the right seat choice will do much the same in the Aís, but thatís a whole other subject.
I have already purchased the stainless top irons and oak bows by working a previous summer job and had planned to buy the tan Lebanon Boney top and have a top shop install it. However, these guys warn that with my 2" chopped windshield the Lebanon Boney top will present problems and need to be cut down so much that it might be as easy to fabricate a top from scratch. What is your advice about the effect of the 2" chop on the fabric top? I have a feeling that I will end up using my whole summer pay for a custom top and that may be necessary, but if it is easy to adapt a Lebanon Boney top maybe I should know that?
The 2" windshield chop is pretty much a non-problem if you have the 2" chopped top irons to start with and the 2" chopped top kit.
You may want to talk to Lebaron-Bonney about what the differences are between a chopped and non-chopped fabric kit.
I do see they have both styles listed, but it looks to me like you could trim a standard top to fit 2" chopped irons.
Thatís required if you lower the middle and rearmost oak bows anyway.
The top this shop put on their Shay (which they use as a shop advertisement) has the '34 type slight slope forward in the back which I like and they have neat side curtains. It sounds like they are in the $2000 range but maybe with a $500 Lebanon Boney top they could do it for $1000 making a total of $500 less.
It sounds like they may be using a 32 top and perhaps 32 top irons.
The 32 top irons are easily adapted to the Aís by sectioning the single top bars at the front of the irons where they connect, take out 2" and weld up.
The 32 tops vertical rear panel - w/glass etc. - has a bit of a forward lean and makes for a nice look on an A roadster.
I believe the 34 tops have even more of a lean forward than do the 32's and most of the Aís running a top that does lean forward are many times described as having a 34 style top.
More than likely itís a set of 32 top irons and all or just a set of A irons cut so that they lean forward in the back.
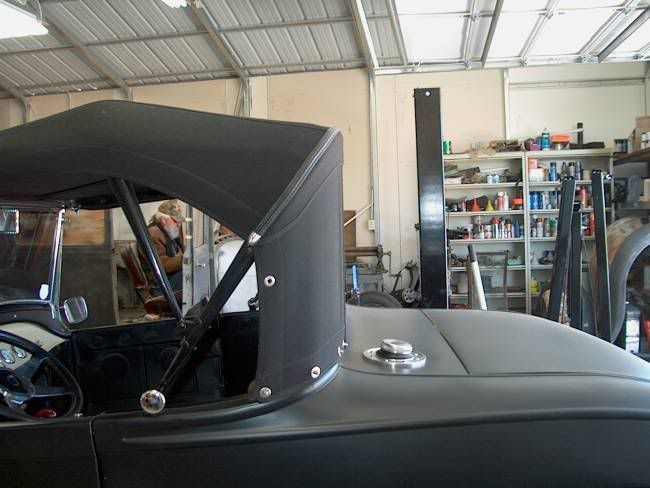
Hereís a pic of my pals 29 roadster showing the straight up and down top rear panel.
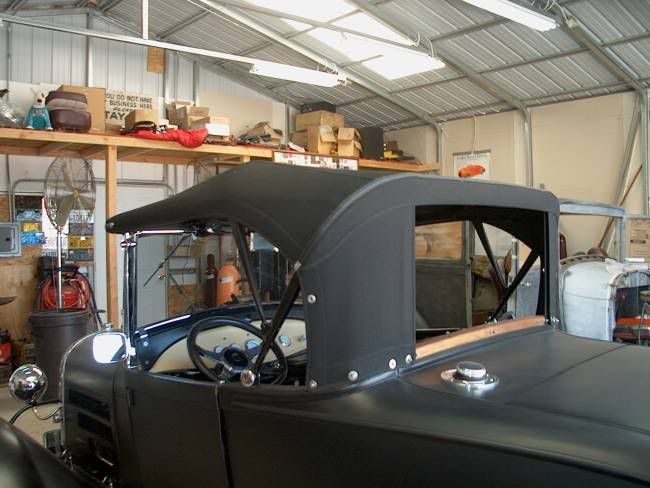
A photo of my 31 on 32 rails roadster with the 32's top bolted to the body pivot straps and sitting on the 32 windshield posts - which is an easy modification requiring only a bit of grinding for proper windshield leanback.
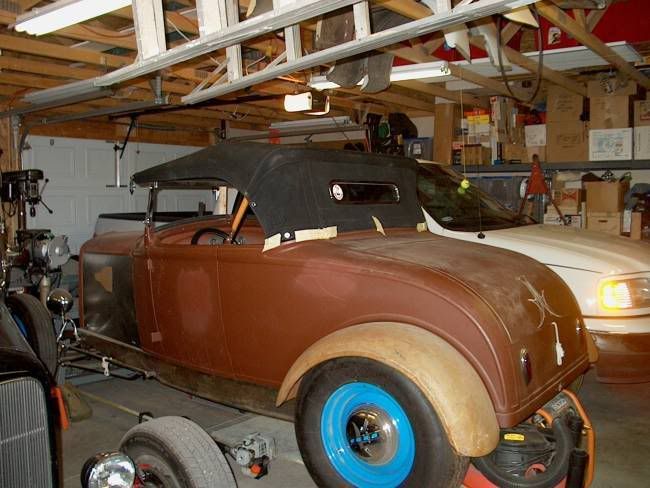
Note that the top is 2" too long at the front in this photo.
You can see where the cut on the horizontal bar will need to be made.
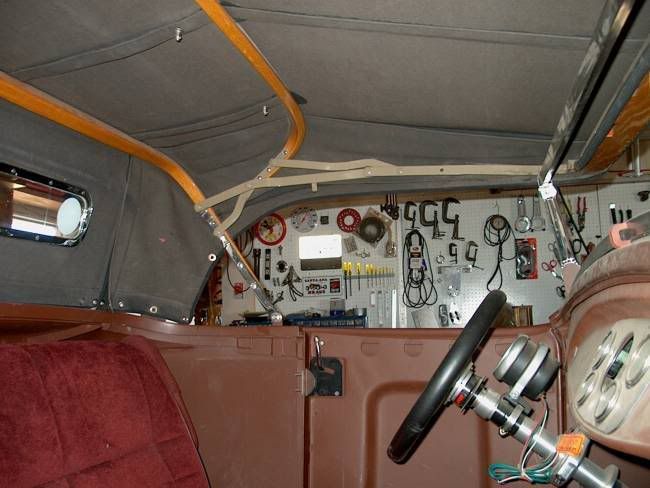
Stock 32's - and those with 2" chop - have a bit of an overhang at the front, but this is way too much.
The windshield frame has yet to be finished and only the upper and lower horizontal part of the windshield frame is shown.
There is no chance I can do it myself, I have met my limit of skill on several parts of this project already, although I might try covering some 1/8" LAN plywood with leatherette for the kick panels and the interior of the rumble seat.
Ya know, the mind is a wonderful thing.
If you tell it you canít do something a few times, itís not long until you canít do it.
Itís ok to recognize and make use of skilled labor at times, but installing a top is an easy project.
I installed mine in about five days, a couple hours at a time of easy work on hot summer afternoons while working the graveyard shift (midnight to 0800).
My power company job was a 24/7 deal so I worked 7 days of graveyard every 5th week.
If youíve ever worked shift work, you know that many times youíre a bit of a dingbat in the off hours.
Body rhythms get out of whack etc.
Nuff said there.
Most shops I've been around order up a Lebaron-Bonney top and install that.
Very few shops make a top from scratch, but many of them will allude to building the whole top from scratch and charge accordingly.
I was quoted a little over $900. eleven years ago and I already had the top irons installed.
A bit high at the time for maybe two-four hours work by two guys installing a kit.
After a little research I got the top and accessories, back window, hold down wing bolts, snaps etc. for about $450.
The Lebaron-Bonney top comes with a good set of instructions.
Read em.
Get the pieces out - no sewing required - lay them out on the carpet and identify each piece.
Helps if you donít have a long-haired white cat - like to never got all the white hair off.
Balled up wad of masking tape sticky side out works best.
Read the instructions again.
One interesting thing is that my wife is willing to pay for a good top rather than a cheaper half-baked job and she really wants side curtains; in fact I get the impression that If the car has side curtains it would go from "useless" to "fun" for her so that sure favors the full custom top.
Smart wife.
A good top is cheaper in the long run.
My topís still hanging in there and looking good after 10-11 years and running quite a few highway miles at 65-75 mph - which are common speed limits out here in the Dez.
Iím still dinking around with what kind of Lexan side windows Iím going to do.
The latest is to copy a British sports car and set up a plug-in window in the door.
A little weather stripping would keep most of the wind out.
Does your wife wear hats?
Mine didnít and finally started once the 32 was up and running.
A lot of gals donít think they look good in hats, but Iím here to tell you that they do.
Lots of nice styles and colors.
And besides, what woman ever turned down a shopping trip?
When you order the top, you can have Lebaron-Bonney install the rear window, but itís better if you do it.
In my case I had to set it up so the roll bar didnít block the view from the inside rear view mirror.
Along those same lines, donít order glass with the top.
Glass is too heavy and will eventually put a sag in the rear panel.
Get the rear window frame, use it as a pattern to cut Lexan and use that for a rear window.
My 11 year old Lexan windwings are still very clear and all I do is wash them when the car gets washed.
Pic showing rear window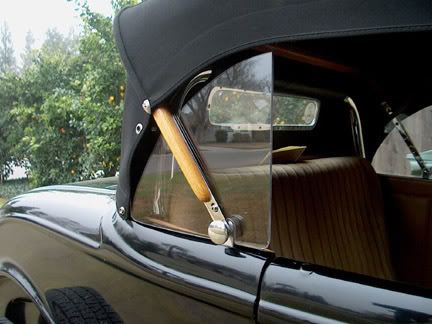
C9
-
Advertising

- Google Adsense
- REGISTERED USERS DO NOT SEE THIS AD
-
02-01-2008 08:21 AM #2
Is there any chance a Lebaron Bonney top can be cut down for a 2" chop?
You don’t exactly cut the top down for a 2" chop.
That happens more or less automatically as you fit the top to the irons and body.
Even so, the top you order should be specified for a 2" chopped windshield.
If you have stock style Model A top irons it may be a bit more difficult to set them up, but the 32 style has a lot of latitude in top shape.
Assuming you have the 32 irons that are set up for the 2" chopped windshield.
Lebaron-Bonneys catalong shows two different sets of 32 irons, one stock and the other for the 2" chopped windshield.
From what I can see, the main top bows angle vertically top iron - the rearmost one - that fastens to the usually visible (depends on the top type) oak bow and pivots on the body strap right behind the door is the one that’s cut down.
Since the top will go forward a little bit when the angled pieces are cut, the front horizontal bar on the 2" chopped irons may be a little shorter as well.
Looking at the Model A top irons, the main top bow vertical top iron could be cut down as well, but they are considerably different from the 32 top irons and oak bows.
The oak bow proper on the A’s looks to me like it is not cut down.
Do a little perusal in the Lebaron-Bonney online catalog.
One of the nice things about the 32 top irons and bows is that you can slide the oak bows up or down before screwing them to the top irons and get the top shape you want.
In fact, if you wanted to go even lower it wouldn’t be too difficult to alter the top iron above the topmost pivot in that area so as to get the middle oak bow even lower.
Not a necessity with a 2" chop.
Use strips of masking tape to get a good idea of how the top will fit/flow (style-wise) before you start tacking the top down.
You can use electrical tape to tape the top irons to the oak bows when checking for fit and flow.
(Be sure to finish the oak bows first. Otherwise the black tape may stain bare wood. I used a marine spar varnish and it’s still holding up ok.)
Stupid as it sounds, I ran around for a couple of weeks with the top irons installed and no top fabric on so I could have a good feel for how things were gonna work in the ingress/egress dept and also ergonomically.
You’ll note in the pic of my 32 there’s a bit of a wedge to the shape.
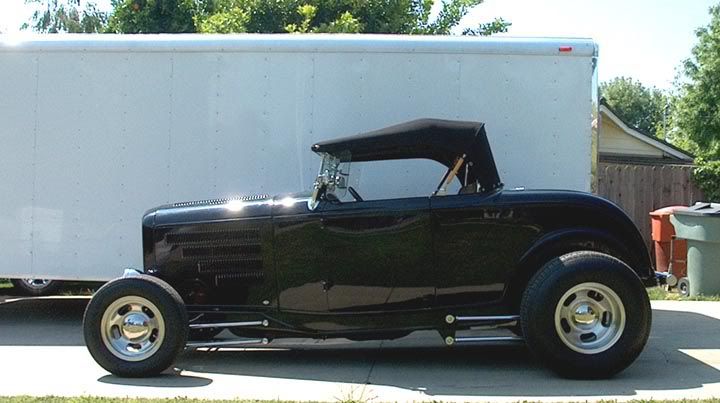
Done deliberately so that airflow across the top would tend to push the cloth down and not let it balloon up.
Most guys set their tops up a little lower and flatter and they do look good.
I haven’t seen any of these cars running at highway speeds so whether or not they have a ballooning problem is an unknown for me.
The fit across the oak bows is where the more or less automatic top cloth install happens.
You have to set it up to match the oak bows & front oak header then trim to length.
Incidentally, regular single edge razor blades work best for trimming, get a box of a hundred and toss em if they get the least bit dull.
You have more control over these than an Exacto Knife or similar.
You need to think hard about where you want to cut the top, once done, there’s no going back.
Even so, no big deal it’s pretty much self explanatory just be careful not to slip and cut an adjacent piece of cloth.
You’ll have to do a little thinking about things vis a vis attaching the top if you use a cut-down top iron - in the horizontal plane, the 2" shorter bit alluded to above - although it doesn’t look difficult.
The top kit consists of seven main parts if I remember right.
That’s not counting the “Hide-em” strip which covers up the line of tacks on front oak header and rearmost oak bow.
You will have some scraps and I recommend strongly you cut them into patches - circular as I did or rectangular - and use some fabric glue to glue them between middle oak bow and top straps proper.
No glue on the oak bow, these reinforcing patches take the wear instead of the main roof top straps that run the length of the top front to rear in the middle and stop at the middle oak bow on the outer straps.
The only part that looks like it would have to be altered for the 32 top is the inner padded pieces that run horizontally fore & aft above the irons on both sides.
Your wifes sewing machine may be able to sew this and if not, hand stitching would suffice since it will be hidden under the top at the rear where it terminates at the rearmost oak bow.
The top front corners of the top and pads are a fitted deal so they’re not usually altered.
This whole project sounds like a big deal, but it’s not.
Installing a 32 top on a 32 is fairly easy, just go slow and take your time.
An A top on a A should be just as easy.
If you’re adapting a 32 top to an A like I plan to do, a little more thinking is required, but it ain’t all that difficult.
Installing a top is one of those satisfying little projects to do yourself.
Way easier than some you’ve already done....
*I have a relatively complete set of cockpit measurements for 29, 31 and 32 roadsters I can post.C9
-
02-01-2008 10:52 AM #3
C9 and Don
If this post 'stays alive' until ~May, I can show you what my upholsterer did for my '31. Unfortunately he had already disassembled the top and interior before I arrived to pick up the body and neither of us had thought to bring a camera a few days earlier. Using the L-B irons (not SS, but painted) and oak, he made the covering to look much like the Chavers '32 top in that it wraps around further. I really don't like the OEM style with the two piece side curtains. I also have a small rear window, with tinted glass (about 5.5 x 19) rather then the larger '31 style. I can't tell you how much it cost me as it is all lumped into his price - tho the fabric, best recollection, was ~$90 yard and significantly heavier and nicer feeling then the standard L-B.Dave W
I am now gone from this forum for now - finally have pulled the plug
-
02-01-2008 12:50 PM #4
We can dig it out again when you're ready.
The L-B cloth I got was T-9.
Seems to be a touch heavier than the T-14 sample.
They have it in a nice light tan color that I may use next time around.
The black color is hanging in there pretty good fade-wise.
L-B is pretty easy to work with, give em a call and ask for the fabric sample package.
The leather seat fabric samples are very nice as well.
One nice part about doing what Child of Ireland - hint, hint, new name - did in talking to the upholstery guy is that they have a wider range of fabrics etc. to draw from.
Even so, I'm happy with my top and a lot of miles and over a decade later it's still doing good.
The part stainless and part painted top irons would look good with a tan top.
I should have painted mine black, but when you're driving or just sitting in the car - waiting for Sweetie at the hat store - they're not noticeable.C9
-
02-01-2008 02:09 PM #5
 Originally Posted by C9x
NO! NO! NO! NOT ANOTHER PERSONNA (Dave - get hold of yourself - it's just an Anonymous moniker) Phew
I'll give my upholsterer a call early next week - I owe him a call anyhow and find out exactly what he used.
I originally bought L-B's entire $15 fabric sample kit and really tried to use one of their products until I finally settled on the material my top is made from. After all, L-B are only about 200 miles from me, and I've been in their shop several years ago when I was commuting to Maine for my job. Their material is very nice - so anything I say about my choices is prejudiced.
As a note, L-B, while easy to deal with, tend to be slow shippers - so order as soon as you can. But - with that said, their top irons are the best and the least expensive, regardless of the fact that they were most likely made by Girtz, who supplies most of the 'A' after marketDave W
I am now gone from this forum for now - finally have pulled the plug
-
02-02-2008 10:53 AM #6
C9x, Thank you very much for your detailed description, it is very helpful. One piece of good news is that I looked over my stainless top irons (they are beautiful!) and to my relief they are marked in crayon with my name AND marked "2" chop", so whew and hoo-ray, I already have the chopped irons along with the windshield. However I note the round holes in the front of the irons want the stanchions to be vertical while mine are tilted back about 10 degrees so maybe a bit of a twist in a vise will be needed. I did call the Lebaron Bonney phone number and the lady there said they do not offer a chopped top for the '29 Ford, implying that they did for later roadsters. So the question is whether if I use the straight-up rear part can the bottom edge just be cut off and the snaps or stables be moved to the new bottom edge? It would seem so but may bring the trimmed edge of the side forward several inches. That would be OK with me since I would like a little more side vision than is available from the blind sides and maybe a smaller lexan quarter window could be added. I like the look of the '40 Ford convert with no rear side windows from the outside but from the drivers position that creates a blind spot. I have to say that I am cruising along on experience and confidence gained from building several spectrometers from scratch in my career but I am pretty much a "bolt-on" mechanic with a rat-tail file and some of the folks on this Forum like C9x, DennyW and Bob (to mention a few) are way, way ahead of me in the skills needed for a total build. I will try to get a picture of the red Shay I saw but I looked at the top bows and since it was rolled over I think they rebuilt the bows from motor boat top frames. That shop does a lot of boat tops as well as cars. I got the impression that they do very good work but prefer to "do it their way" at $70/hr. Prior to this I also had the top on my Sunfire repaired and talked to a different shop about the roadster top. I think I will ask around and see if that shop will install a Lebaron Bonney top with my chopped bows for less and still have the experience of a person who installs tops day in and day out. One thing that worries me is that when the "supposedly chopped" irons are on the stanchion posts, the irons look too low, I will try to get a picture. Thanks again C9 and if IC2 finds some pictures I would like to see them too.
Don Shillady
Retired Scientist/teen rodder
-
02-03-2008 01:18 PM #7
C9x and IC2, This is a valuable thread which I have to study more. Overnight I got to thinking that I could/should mount the top irons the way C9x said he did and put tape over the outline. Then I can decide which shop can do the final cloth installation and make the side curtains. As I said I am a little concerned that my stanchions tilt back slightly and the top irons have a corner angle with a verticle pipe section welded in for a "Flat" fit so with a mock up of the irons I can tweak this to fit before the cloth is added. If after all I end up with the straight-up back shown in the pictures that is OK, but maybe a slight displacement of the screw holes in the back bow can add slight forward lean. In any case it looks to me that a standard Lebaron Bonney '29 top should be able to be trimmed at the bottom edge with almost no change except in height.
Don Shillady
Retired Scientist/teen rodderLast edited by Don Shillady; 02-04-2008 at 08:29 AM.
-
02-03-2008 04:33 PM #8
i'll just add, another good reason to install your back window yourself.
And . . . don't cut the window out of the cloth until you're near the end.
Clear?
Install the window frame complete with glass/Lexan.
Complete the top install.
If you're happy with the top, then cut the window out.
You may or may not be able to move the window after the install.
I has 6-32 screws if I remember right.
The hole they make is small and my thinking is they may close up if the window is moved.
Use an awl to make the holes for the window and the cloth will be displaced and not removedlike it would be if you drilled - a perhaps dangerous thing to do far as damaging the cloth goes - or used an Arch Punch.*
*also known as gasket paper hole makers....C9
-
02-11-2008 02:41 PM #9
C9x, In your new roadster you have a red Mopar seat and that is where I got the idea. I really like my red seat but it goes back into the corner of the '29 cockpit pretty tight. You have a little more space in your '30 but even so the seat looks pretty tight in the back corners. The reason I am asking is that I have greatly admired your roll bar in the '32 and would interested in whatever plan you have or comments about the possibility or plans for a roll bar in the new roadster. I don't see any easy way to cut into the corner of the seat without a total recovering afterward but you are very clever and may have an idea.
Don Shillady
Retired Scientist/teen rodder
-
02-12-2008 08:03 AM #10
 Originally Posted by Don Shillady
Actually, the 28 thrugh 31 A roadsters have virtually the same size cockpit - as does the 32.
As noted, I have measurements from an article I did for the HAMB 12-18 months ago.
The seat is from a mid-90's soccer Mom van
It is the genuine two passenger model.
Reason I point it out is, at times you’ll find the three passenger seat in the middle, there are mounting points for both.
Note that the folding armrests will fit and operate and if I do the same roll bar setup they will probably fit with the roll bar.
I don’t have any good close-ups of how the roll bar vertical piece goes, but the seats in the 32 are foam on veneer 3/4" plywood and the foam was cut to fit.
This pic combined with the interior shot of the 32 above may give you an idea.
Note as well the main hoop has a shallow angle bend just at the seat level.
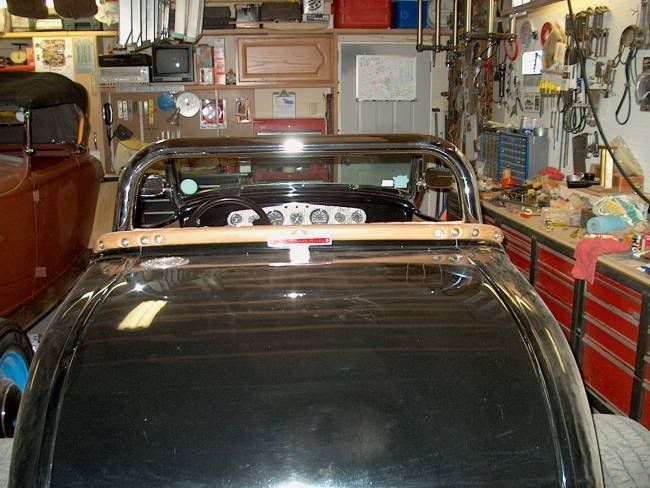
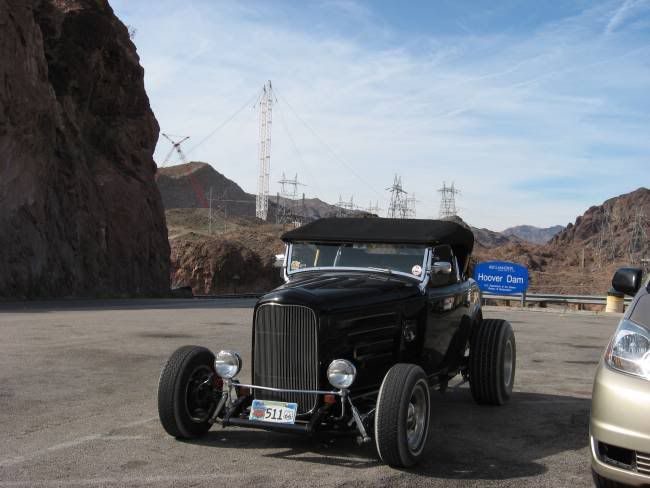
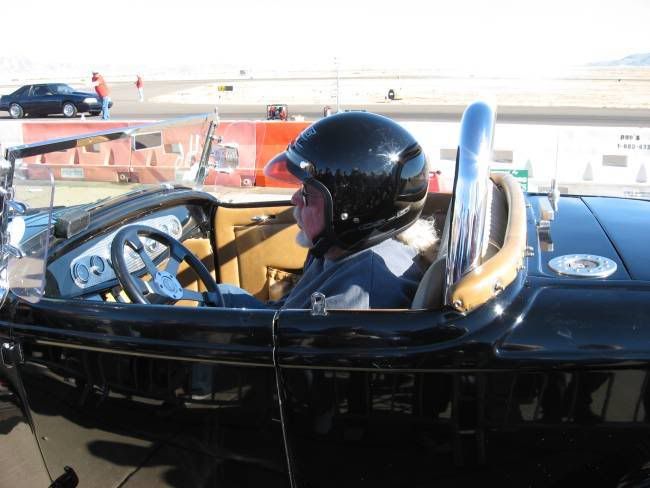
Done for aesthetics, but its worked well with top on etc.
This pic shows the trunk interior and how the four point setup goes.
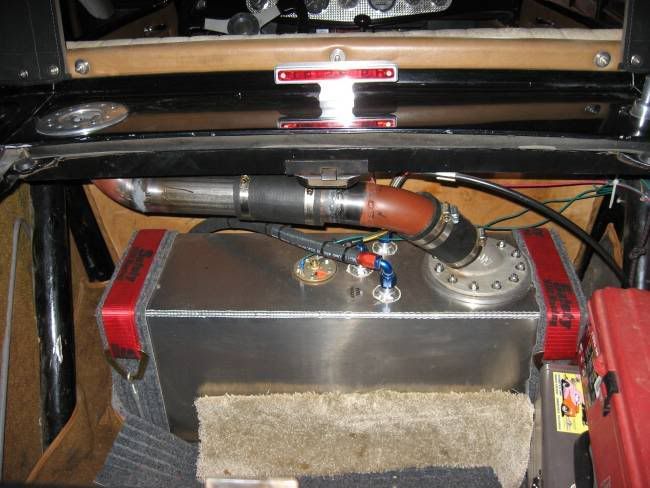
The roll bar is only chrome plated on the upper part.
There is a full .090 aluminum sheet firewall between seat and fuel tank.
Not shown here because it was out for the fuel tank install.
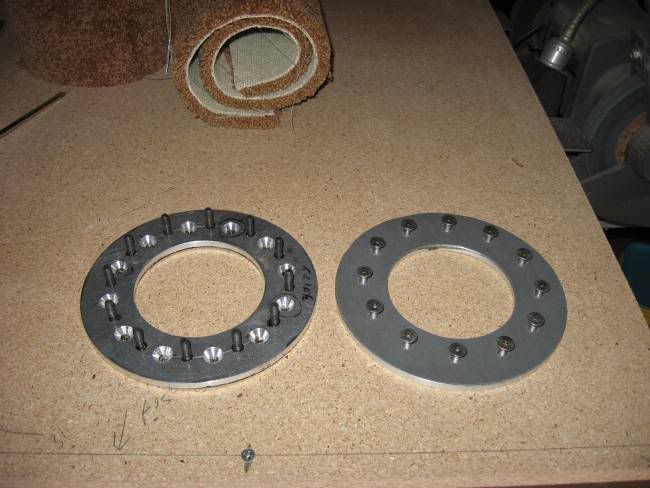
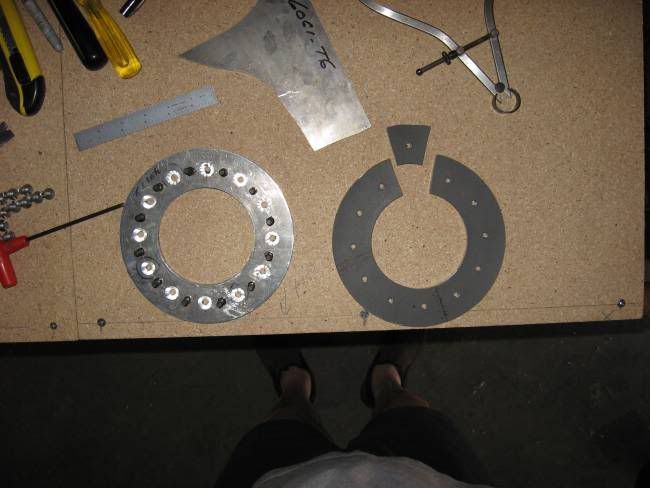
I recently replaced the JAZ fuel cell that was - and always had - weeped at the full filler juncture.
These pics show the rings I made up to cure the same - and worse - problem with the Summit fuel tank.
(Also a complete article on the HAMB.)
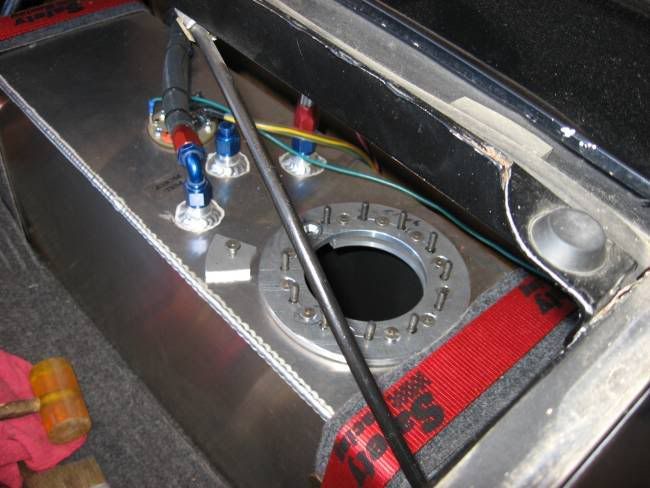
Roll bar is 2 Ĺ" x .120 DOM tube.
The bars have 1/4" mounting plates welded to them, two 1/2-20 bolts each plate.
Grade 8's.
They bolt to machined 1 3/4" x 2" x .3/4" thick backup pieces that have a step machined in to fit into a 1" hole in the frame so the fit is flush.
They are also TIG welded at the 1" hole.
Make up a jig with 3/16" or so holes to match the roll bar mounting plate bolt spacing.
Drill the frame with the pilot drill, remove jig then enlarge with a 1" drill.
The stepped and threaded frame weld bungs are then installed.
It will help in the installation of the bar after welding is complete by drilling the mounting plates a 1/32nd over the Ĺ" mounting bolt size.
You’ll want to tack weld the roll bar plates to the tube with the plates bolted to the frame.
Then tack the rear bars to the main hoop with 6-8 strong tacks.
Remove roll bar for finish welding.
Clamp a sturdy piece of angle to the mounting plates to help stop distortion of the main hoop when the straight tubes get welded to the main hoop.
After finish welding you’ll probably have to spread the main hoop a touch in or out transversely depending on which way the hoop went during the welding process.
This shot shows the roll bar hoop and short straight pieces.
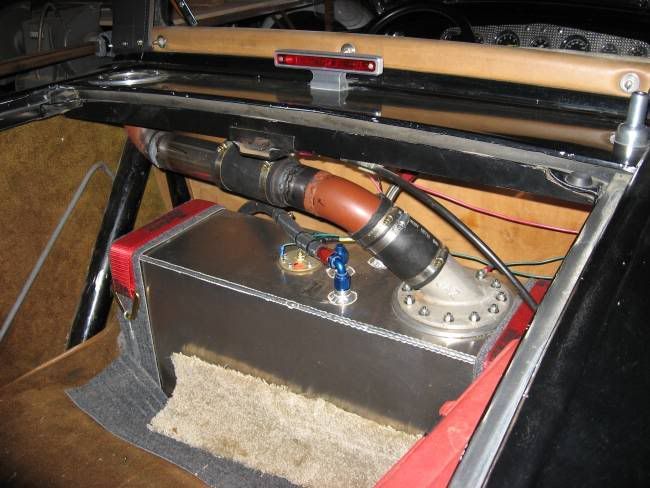
The short straight pieces have a long fishmouth that butts precisely up to the main hoop verticals.
In years past, this is all the drag racing organizations required for competition use.
It did pretty well, but as speeds in a class got higher I understand some of them folded up.
Granted, a roll cage would be better, but for the lower speeds involved in street use it should do ok.
The bigger tube has considerably more strength than the typical roll cage tubing of 1 5/8" or 1 3/4".
I’m pretty sure the machined, stepped weld bungs in the 32 won’t pull out.
Even so, this time around I plan to make some 1/4" thick inside the frame reinforcing plates with their own threaded weld bungs.
The 1/4" plate won’t be threaded, but the threaded weld bungs will have a minimum of Ĺ" threads.
That should be sufficient to capture the full strength of the mounting bolts.
My research shows that full strength of threads is developed by having the nut - or weld bung - at least as deep as the bolts OD.
Hope all that’s clear....Last edited by C9x; 02-12-2008 at 02:57 PM.
C9
-
02-12-2008 08:11 AM #11
I'll try to shoot and post a pic or two later this afternoon of how the roll bar vertical goes past the seat.C9
-
02-12-2008 02:39 PM #12
C9X, Thanks for your usual details on excellent craftsmanship. The armrests on my seat fit inside the cowl OK but I removed them thinking the inner panels needed the room. Even without the armrests my seat is right up against the back edge of the cowl with only very slight room in the corners. I would be interested is some safety even if the roll bar does not pass NHRA specs and would be interested in getting a smaller diameter bar with a thicker wall. It is possible with a smaller diameter tubing the corners of the seat would deform enough to make foom for the tubing. I realize the larger diameter is probably stronger but maybe cold rolled steel pipe could be used, filled with sand and bent into a hoop. I look forward to the inside pictures of the corners of your seat AND to see how you treat the new roadster.
Don Shillady
Retired Scientist/teen rodder
-
08-17-2009 08:34 AM #13
This thread is about 18 months old but shows some excellent craftsmanship and tech details from C9x. Everthing takes longer than I expected and I am still only about 20% complete on wiring my roadster but I recently put on the top irons and bows for the top. Then I started wondering about the possibility of side curtains and so this thread shows the neat idea from C9x of using lexan quarter panels instead of the so-called "Gypsy" cloth quarters. I am still musing over the side curtain design but I already know I don't want to drill any more holes in the windshield stanchions through that tough stainless so I plan to use just the two bolts on the stanchion for the windwings to anchor the front part of side curtains and thanks to C9x I have some tight clamps on the lexan windwings. The two bolts are pretty close together due to the 2" chop of the windshield frame. After looking at some of the pictures on this thread I put a plumb line on my back bow and see that I will probably not have a backward slant on my top even allowing for some padding. I do not understand how this happens with the chopped irons but maybe the Brookville rear bow is pulled in a bit; anyway it looks like near vertical or even a little forward slant for the rear. The next design problem is that I plan to use a custom top made by a local shop where I have seen good work on a '34 Dodge roadster. I have looked at Jeep zipper side windows and the picture I am attaching of a repaired Shay roadster redone at another (more expensive) local shop which has the quarter panels totally blocked out with zipper windows. In the final analysis I will just have to sit down with the top shop guy and work out what he can do but I favor some sort of zipper arrangement but with rear quarters available for visibility. One last update is that I have purchased a resto rear window frame from Brattons in Md. but I bought the slightly larger Sport Coupe window because it was $187 compared to $220 for the smaller roadster window. I have already had it fitted with 1/16" Lexan which makes it lighter than glass and the larger size will fit into the vertical gap at the rear bow, but now I will need those rubber bumpers on the rear sill to keep the window frame from scratching the paint when the top is down. Maybe visibility will be little better through the larger window?
Don Shillady
Retired Scientist/teen rodderLast edited by Don Shillady; 08-18-2009 at 10:28 PM.
-
08-17-2009 06:46 PM #14
I scratch-built a Sid Chavers style top for my '34 roadster using 5/8" stainless tubing for the frame and Marine fabric called Seamark, a urathane-backed polyester, for the topping. My wife & I just finished a 3500 mile trip to the East Coast from Northern Ontario and I found that the top fabric had stretched a little. I want to re-do the top fabric over the Winter and was wondering what fabric to use, that wouldn't stretch. L-B's tops advertise a product called "Stayfast" Anyone have any experience with it. Any other suggestions are appreciated!
MikeIf you're not cruisin'.....you're wastin' gas!!
-
08-17-2009 11:43 PM #15
Tomorrow I'm going to attempt to install a bop top on my 32. I have a duvall windshield on the car. I have to admit I'm a bit nervous to drill and tap the duvall windshield, but I really don't have any other option. I've had the top for about 18 months but have just been putting it off. But tomorrow will be the day. Hopefully everything will go smooth and I don't end up drilling into the glass, or somehow ruining the windshield. I will try to take some pictures as I go along. Wish me luck.


 LinkBack URL
 About LinkBacks
 Reply With Quote

A travel agent was sitting at his desk when he noticed an elderly couple standing outside, gazing longingly at the posters of dream vacations in the shop window. They looked sweet, and honestly, a...
the Official CHR joke page duel