


Thread: do your own interior


Results 16 to 30 of 33
 LinkBack URL
 About LinkBacks
Hybrid View
-
10-28-2008 08:38 AM #1
 CHR Member

- Join Date
- Dec 2004
- Location
- Coralville
- Car Year, Make, Model: 41 willys coupe
- Posts
- 282
Here's a rear window molding for the willys.
It is impossible to find rear window moldings for a 41 willys and if you do they are usually a rusty POS that cost several hundred $. I made my own by taking a pice of 1/4" plywood and rough cutting it 3" bigger than the opening. I held it up to the opening and had Shirley mark the inside of the glass lip with a felt marker. I then added 1 1/2 " to that line and cut it out. After sanding and smoothing the curves I cut a strip of 1/8" masonite 1" wide and glued and staple it to the inside edge of the pattern. Fill in the back inside corner with fiberglass putty and then grind the glued corner so it has a nice round edge. . Now here's is a neat trick. cut your 1/8" foam 5" wide by the inside radius length + 1/2" overlap. Start by glueing the foam to the INSIDE of the moulding first. After it has set up stretch to foam around the outside of the frame being careful not to tear it. Keep moving around the piece pushing the foam out as you go. this will give you a very tight wrinkle free surface. If you start on the outside you will have all of the excess foam to deal with as you push it inward which will leave wrinkles that you will have to slice to get rid of. Bring your foam all the way around the 1/4" edge and cut with your razor blade so it is flush with the BACKSIDE of the plywood.
Lay your moulding on your vinyl and trace around the insde and the outside edges add 1" onto each line. Glue your vinyl to the insde surface first and let it dry completely. Now begin to work the vinyl up and around heat and stretch it going around the frame and you will have a nice tight seemless covering. Sorry I don't have a good picture of the finished molding right now.
-
10-28-2008 08:33 AM #2
CHR Member
- Join Date
- Apr 2005
- Location
- new bloomfield
- Posts
- 356
I do like using 3m #90 spray glue....itis in a black and green can . Holds up better to high heat in the summer months
-
10-28-2008 01:00 PM #3
CHR Member
- Join Date
- Mar 2007
- Location
- Southern
- Car Year, Make, Model: 77 chevelle
- Posts
- 165
Looks to me like you've got some hidden God given talents !!
-
10-28-2008 05:14 PM #4
CHR Member
- Join Date
- Apr 2005
- Location
- new bloomfield
- Posts
- 356
you can also use a sanding block to sand the edges and put a contour on them
-
10-29-2008 07:12 AM #5
CHR Member
- Join Date
- Jan 2004
- Location
- Macomb
- Car Year, Make, Model: '32 Ford 3W Coupe, 383 sbc
- Posts
- 1,593
I did my own interior as well with the exception of the seat, console and dash. I don't sew, but I can fabricate and glue stuff together.
Lynn
'32 3W
There's no 12 step program for stupid!
http://photo.net/photos/Lynn%20Johanson
-
10-29-2008 07:15 AM #6
CHR Member
- Join Date
- Dec 2004
- Location
- Coralville
- Car Year, Make, Model: 41 willys coupe
- Posts
- 282
Lynn,
Nice job, I especially like the door panel layout.
John
-
10-30-2008 03:32 AM #7
CHR Member
- Join Date
- Mar 2007
- Location
- Melbourne, Victoria, Australia
- Car Year, Make, Model: 32 3 window coupe
- Posts
- 48
how is the headlining in that 32 coupe done without the pleats in it for the bows? Is it a fiberglass mould or was it made specifically for the car?
-
10-30-2008 07:00 AM #8
CHR Member
- Join Date
- Jan 2004
- Location
- Macomb
- Car Year, Make, Model: '32 Ford 3W Coupe, 383 sbc
- Posts
- 1,593
I stapled interior backing (waterproof cardboard) to the wooden bows with an air stapler. From there, I covered it with quarter inch closed cell foam using 3M's #90 spray glue. After than I covered the foam with the vinyl fabric using the same spray glue. I don't know how Iceburg did his, but perhaps he can chime in. It looks like a full ceiling insert, but he will have to explain what he used to hold it up there.
Lynn
'32 3W
There's no 12 step program for stupid!
http://photo.net/photos/Lynn%20Johanson
-
10-30-2008 07:12 AM #9
CHR Member
- Join Date
- Dec 2004
- Location
- Coralville
- Car Year, Make, Model: 41 willys coupe
- Posts
- 282
 Originally Posted by rumrumm
I did the Willys much the same way as Rumrumm did his accept I used 1/8"closed cell and 3M 74, then added the raised portions with more pieces of 1/8" then covered that with the same type of headliner material used in new cars. I found the headliner material is much more pliable than vinyl and you can get around the corners with out any wrinkles. It is all a matter of preference as to the material and the final look you want. Headliners always seem so daunting but are really not that hard.
John
-
10-30-2008 02:59 PM #10
CHR Member
- Join Date
- Apr 2005
- Location
- new bloomfield
- Posts
- 356
Made a mold for the roof in one piece from glass and then cut in two to cover and fit. .
You can see it here and then notice the line where it was cut in the second pic

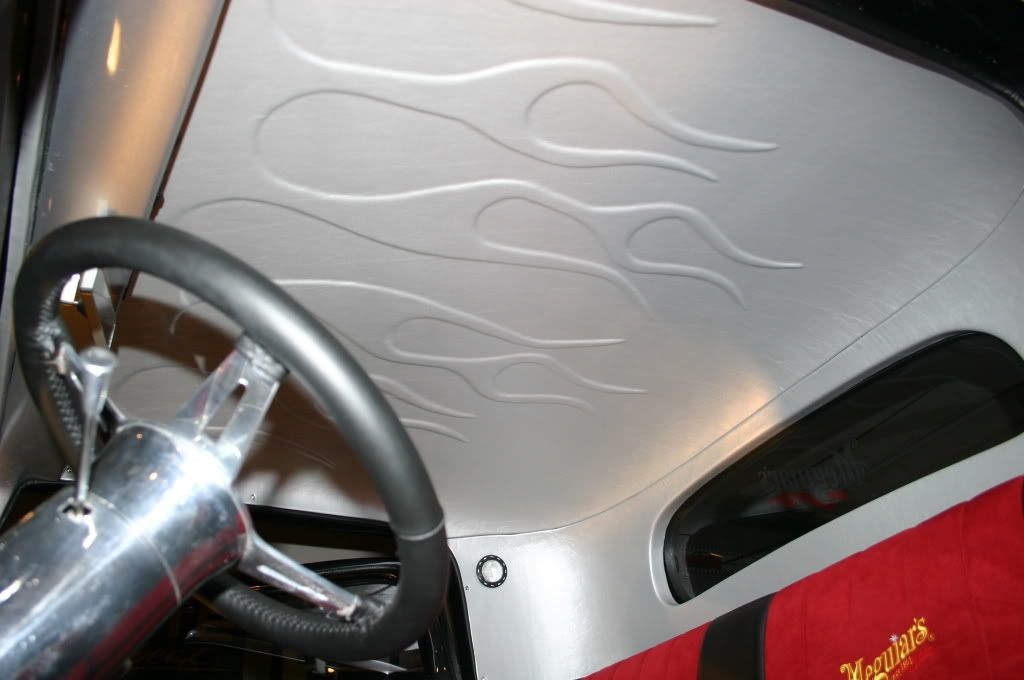
The reason I cut it was to be able to get the curves looking correct with the material.
Leather will not shrink as easy as some others
-
10-30-2008 04:28 PM #11
CHR Member
- Join Date
- Feb 2007
- Location
- Santa Monica
- Car Year, Make, Model: 37 Ford tudor humpback
- Posts
- 1,988
Hey Icebergh,
How did you make the fiberglas mold? I've never worked with fiberglas but would be interested to know the process you went through to create this piece for your car. Thanks.
Randy"It is not much good thinking of a thing unless you think it out." - H.G. Wells
-
10-31-2008 03:07 PM #12
CHR Member
- Join Date
- Apr 2005
- Location
- new bloomfield
- Posts
- 356
The head liner came with the car...we made the exstensions using slipsheets...basically a real heavy paper board and formed it to shape then used glass sheets and resin. Lots of grinding and sanding to form Originally Posted by randyr
-
10-31-2008 02:52 PM #13
CHR Member/Contributor
- Join Date
- Jul 2007
- Location
- Ellsworth
- Car Year, Make, Model: 29 Essex RS Coupe
- Posts
- 377
Gosh darn, you folks make that look easy!!!!!! I wish some of you lived closer to me, I do! GREAT WORK. One of the best threads I've read for sure! Many thanks. PerleyToo old to work, Too poor to quit. 
My build thread. http://www.clubhotrod.com/forums/showthread.php?t=39457
 Reply With Quote

Posting Permissions
- You may not post new threads
- You may not post replies
- You may not post attachments
- You may not edit your posts

A travel agent was sitting at his desk when he noticed an elderly couple standing outside, gazing longingly at the posters of dream vacations in the shop window. They looked sweet, and honestly, a...
the Official CHR joke page duel