Thread: 500 Caddy/G Body Swap
Hybrid View
-
12-15-2009 11:26 PM #1
".....Just a few more hours of fab time Mike, what the heck?????....."
Dave I got tired just reading that
The old Dodge still goes OK, but much as I hate to admit it the couple of guys who commented that I made it too nice to use as a shop truck were right ...I hate puttting anything in the bed (although I do) for fear of tearing up the paint
I also kind of miss the lower bed height of the El Caminos and this ones getting a spray in bed linerLast edited by Mike P; 12-16-2009 at 06:31 AM.
I've NEVER seen a car come from the factory that couldn't be improved..... 
-
12-16-2009 05:11 AM #2
Good move; also I found a place called Rubber Cal that sells bulk rubber mats of just about any thickness, shape and size. I'm going to buy a roll of their 6mm thick to use as a mat in my van. You might take a look, maybe there's something you can use.
www.rubbercal.com
-
01-01-2010 05:28 PM #3
Well I've been plugging away, the bumper came in a while back and overall Iím pretty pleased with the quality and the way it fits initially (it is going to take some fitting to make it right but overall itís pretty close. I also went ahead and installed a class III hitch Ö.. worked out pretty well but Iíll probably have to dump the exhaust behind the rear tires instead of straight back.
I also managed to get the brackets for the console installed and the shifter put in and hooked up.I've NEVER seen a car come from the factory that couldn't be improved..... 
-
01-01-2010 09:10 PM #4
Looking good, Mike! This thing should scoot really good.
-
01-02-2010 06:35 AM #5
Good choice Mike, that bumper will really smooth out the lines in the back! I've yet to buy an aftermarket part that didn't have some fitting required, looks like you're on the same roll!!!!Yesterday is history, tomorrow is a mystery, Live for Today!
Carroll Shelby
Learning must be difficult for those who already know it all!!!!
-
01-17-2010 06:55 PM #6
The oil filters on these swaps are real tight to the front sway bar and a lot of people space the sway bar down. The other option is to use the later style oil pump from a 425 which tuck the filter in closer. It’s still snug, but as the truck is currently up on stands and the suspension is unloaded I think I will pick up a little bit more room.
I spent the last week doing exhaust. Like everything else on this it’s tight too. On the passenger side I had to trim the flange a bit just to get it to fit and on the drivers side there is less than 1/2" clearance between the flange and frame. I’ll probably use a bit of heat and BFH to gain a little frame clearance once I get the engine back out……I don’t need a lot but a bit more would be nice.Last edited by Mike P; 03-28-2010 at 06:39 AM.
I've NEVER seen a car come from the factory that couldn't be improved..... 
-
01-17-2010 06:58 PM #7
When everything was fitted and tacked I pulled the pipe out and welded it all together. I used a couple of ball and socket joints at the mufflers so the whole head pipe can be dropped if I ever have to pull the crossmember and or transmission.Last edited by Mike P; 03-28-2010 at 06:55 AM.
I've NEVER seen a car come from the factory that couldn't be improved..... 
-
01-17-2010 07:00 PM #8
I was really kind of wondering how the tail pipes would fit. When I did the wife’s 84 El Camino last year I used 2 1/4" tail pipes over the stock 7.5 rear end and it was tight. The 2 1/2” flowmaster tailpipes actually fit very well, but I suspect that part of that is due to the Lakewwood upper control arms being a lot narrower than the stock stamped ones.
The tail pipes coming out behind the rear tires came out pretty good too. I still have a bit of welding to do and add one more hanger and some tail pipe tips but the exhaust is pretty much done.
I did decide one thing doing the exhaust…….once I get the new shop up and the lifts in I will be buying an exhaust pipe bender. This piecing bends together to build an exhaust gets old after a while. I priced some benders last week and the price wasn’t as bad as I thought it was going to be. I’ve got plenty of time so who knows I may even come across a decent deal on a used one.Last edited by Mike P; 01-24-2010 at 01:23 AM.
I've NEVER seen a car come from the factory that couldn't be improved..... 
-
03-28-2010 02:55 AM #9
Progress slowed down a little bit the last couple months but didn’t come to a complete stop. I did a steering column swap to an earlier unit that was in a bit better shape than the one in the truck. It also has the earlier style cruise control turn signal handle and no wiper function which will match up with the earlier under dash harness from the 78 Monte donor car.
I did the typical remove the shift handle and fill the nub. While the column was out I also pulled the steering gear and resealed that and installed a new rag joint.Last edited by Mike P; 03-28-2010 at 06:42 AM.
I've NEVER seen a car come from the factory that couldn't be improved..... 
-
03-28-2010 03:06 AM #10
Before I reinstalled the new column I decided to see if I could gain a little clearance between the exhaust manifold and steering column by slotting the mounting holes and shifting the bottom of the column over a little. It actually worked out pretty well and not only gave me a bit more clearance on the exhaust but also moved the shift lever on the fire wall side over enough to let me squeeze the linkage between transmission and column in (with a few mods).
I wanted the linkage between the column and transmission connected because even though the truck now has a floor shift the collar on the column still needs to rotate to make the backup lights and in dash shift indicator to work. It also locks the floor shift handle in park then the steering column is locked.
I also picked up just a bit more clearance when I found out the shift linkage from the Monte Carlo I parted out was only 1/4Ē instead of the thicker 3/8Ē linkage that came with the 83 El Camino. I really donít know why the difference. They were both column shift cars and the bends in the rods are identical. I guess itís just one of those things that make you go HMMMM.I've NEVER seen a car come from the factory that couldn't be improved..... 
-
03-28-2010 03:10 AM #11
In spite of the extra clearance there was still an interference problem between the linkage and exhaust manifold. The solution I used was to re-drill the linkage holes closer into the pivot points (If you do one you have to do both as otherwise it changes the ratio between the 2 arms and will prevent the shifter from going into low gear and the shift indicator from reading correctly). When I pull the engine back out I will trim the excess off the shift arm and clean that up a bit.I've NEVER seen a car come from the factory that couldn't be improved..... 
-
03-28-2010 05:20 AM #12
Good ideas, Mike! I like the exaust; very clean job.
-
05-02-2010 06:36 AM #13
I've been moving along with the mockup. The brakes are done and fuel lines to include a new fuel return line have been run.
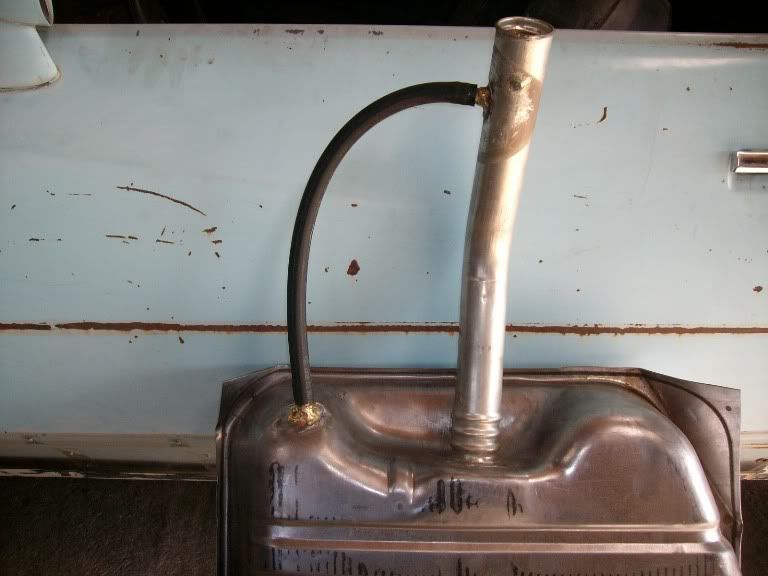
I found out I did have some issues with the fuel tank I needed to address. When I got the El Camino the tank and straps had been robed from it. I bought a new aftermarket tank and straps and had installed it so I could make sure I had plenty of clearance for the exhaust and run the new fuel return line. Shortly after I had done this It came across some posts on another site that indicated the tank I had bought had venting problem that caused the tank to only fill about 1/2 way.
I figured I would work on that after I took the truck apart but then the tank in the wife’s El Camino sprang a leak a couple of weeks ago. I ordered another tank made by a different manufacture that one guy had indicated didn’t have a venting problem and put that in the wife’s El Camino last weekend. Guess what it has the same venting problem….I could only pump 12 gallons in the tank (it’s a 22 gallon tank) before it would shut the pump off and start spitting fuel out of the filler neck.
Anyway I pulled the tank out of my El Camino brazed a couple of 1/2" barb fittings on it and ran an external vent line. I really don’t mind welding on a new tank that never had gas in it, but at some point I will have to purge the tank I had put in the Donna’s El Camino and make the same mod.

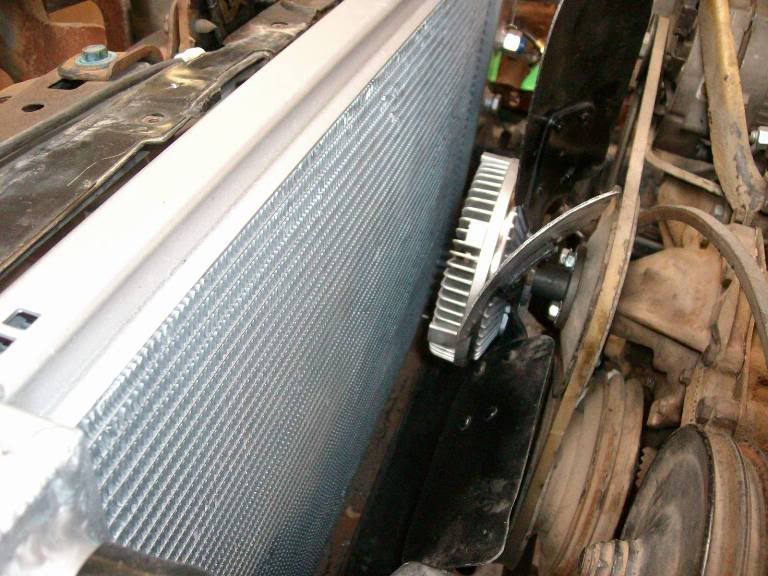
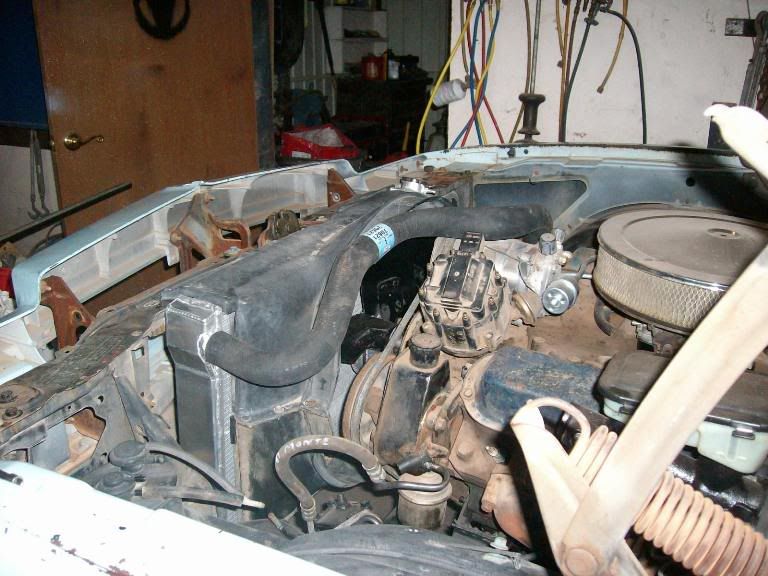
With that taken care of I got the radiator in and fortunately found I had room for the heavy duty fan clutch and 7 bladť fan.

The radiator is in the stock location but I had to move the shroud over about an inch to center it on the fan (due to the engine having been shifted a like amount due to clearance issues). This will probably work, but I'll try to find a little wider shroud to completly cover the core.
I'm still working on finding a lower radiator hose that will fit but a stock upper Cadillac upper hose works well and a power steering pressure hose from an 81 Monte Carlo also seems to work well after I changed the fitting in the back of the pump from a compression fitting to an O Ring fitting to match the steering gear.

The last thing I should have to do before I can call the mockup done is to get the Hot Rod air unit mounted under the dash.Last edited by Mike P; 05-16-2010 at 04:11 AM.
I've NEVER seen a car come from the factory that couldn't be improved..... 
-
05-02-2010 08:01 AM #14
Kick ass build .... I love it.
I'd seen a graft (Buick GN clip) on a mino many years ago & always like the look.
You've done a great job so far.
REGS
-
05-02-2010 06:27 PM #15
Working out great, Mike!! Seems on every build there's some easy things that wind up eating up a bunch of time!!! The big fan and radiator should cool the beast just fine!Yesterday is history, tomorrow is a mystery, Live for Today!
Carroll Shelby
Learning must be difficult for those who already know it all!!!!


 LinkBack URL
 About LinkBacks
 Reply With Quote

And then a newer model....
Montana Mail Runner